Ramblings of General Geekery

The journey to Diaspora: setting up your own pod

The first step in the journey to Diaspora is to get your own Diaspora server because, well, that’s the whole point of a distributed social network: you get to own your stuff (you could argue that, on the other hand, I’m not running my own email server, but, err, whatever, indulge me).

Unfortunately, setting up a Diaspora pod is insanely convoluted and complex.

After the jump, we’ll get into the meat of things and hopefully it will help you with the process (if you ever want to attempt it).

Follow the guide

Looking at the complexity of setting up a Diaspora pod, there’s something to be said about the Ruby community, who often seems to degenerate into a pile of over-engineered, over-complex set of weirdly named libraries and tools, all of which end up being very slow and memory hungry. Hipsters was the worse thing that ever happened to the Ruby language.

Anyway, enough trolling, you probably want to start by following the installation guides, over at Github. My server is an Ubuntu virtual machine so I followed the Ubuntu guide which will make you apt-get install a whole lot of packages, from system libraries to Ruby and the usual suspects (gem, bundler, rake, etc.). Once that’s done, you move on to the Diaspora installation guide itself, which is where things get fun (given a certain definition of “fun”), and where I’ll try to hold your hand (no homo).

Note that several “easy installer” initiatives are being worked on, mostly targeted at popular hosting companies like Heroku. By the time you read this, you may have something available for your situation.

Get an SSL certificate

The first thing you need is an SSL certificate for your domain. Since you’ll be exchanging potentially private communications between your pod and the other pods, it’s a good idea to go through https, which means getting an SSL certificate. You could usually use a self-signed certificate for this, but the bigger pods (a.k.a “community pods”) won’t accept that, so you need a proper certificate.

The documentation will point you at StartSSL, which delivers free class 1 certificates for your domain for a year. That’s enough to get you started. Just go to their website and follow the instructions – you’ll end up with a few keys and other serious-looking files. If you plan on hosting your pod on a sub-domain, don’t forget to add your top-level domain to the alternative domains falling under the certificate.

Getting Diaspora

If you keep following the installation guide, you will at that point have cloned the Diaspora repository on your server, run a few commands like bundle install, and edited a few configuration files. Here are a few tips, though:

  • Before you do all the RVM and bundler stuff, make sure you apt-get install libreadline-dev libncruses-dev. Hopefully this will make the readline gem work right away. We’ll talk about that later.
  • For some reason, the config/application.yml.example file features a pod_url with a port 3000 specified. Make sure you take this out when you replace it with your own domain URL. This has to be the real, public URL (otherwise your Diaspora ID will have :3000 in it!).
  • For me, the ca_file was /etc/ssl/certs/ca-certificates.crt, but it of course depends on your Linux distribution.

Of course, you’ll need to follow the instructions for setting up a “production” server. Don’t set serve_static_assets to true, there’s no need for that – Apache will serve the static assets already. Set single_process_mode to false, too, because it looks like it’s mostly for development/debugging purposes.

I’d recommend setting up the mailer right away (it’s the thing that sends notification emails). For some reason, even when mailer_on is false, Diaspora will try to send some emails, resulting in errors and failed jobs. It’s not a huge deal (maybe), but I like to avoid false positives in my error logs. Here it goes:

  • Install sendmail with some apt-get or something.
  • Set the mailer_method to sendmail.
  • That’s it! (although you can optionally set some nice email address for the sender).

Setting up the database

For some reason, the config files assume you’re going to run the app with the root MySQL user. I don’t know what they’re smoking over at DiasporaHQ but there’s no way I’m going to do that, so instead I created a new database myself, called diaspora_production, and a user with access to that database. You could call the database differently, I guess, but you would have to go and change the default name in all the configuration files. And I’m not sure if there’s any hard-coded stuff somewhere that references that database, so I went with the safe route of using their naming convention.

Once that’s done, you don’t need to run the db:create Rake task. Just run bundle exec rake db:migrate. You should see your database filling up with tables.

Apache configuration

Now you’ll need a web server to actually get anything working. I’m using Apache for this.

The first thing is to make sure the SSL/https stuff will be working:

  • If you don’t have that already, add NameVirtualHost *:443 and Listen 443 to your conf files to make Apache listen to incoming connections on port 443 (which is used for https). You can put that next to the similar directives listening to port 80 (which is standard http).
  • You’ll need to open port 443, obviously, in case you have a firewall (which you should have). Again, just look for where it deals with port 80, and copy/paste. If you’re using iptables, you should end up with something like -A INPUT -p tcp --dport 443 -j ACCEPT.
  • Make sure you have mod_ssl loaded/enabled.

Then, add an entry for the new website (your pod). You can use this Apache configuration that they point to in the installation guide. The only modification I did is to add a reference to the SSLCACertificateFile I got from StartSSL. So all my SSL stuff would look like this at the end:

SSLEngine On
# You generated those with StartSSL
SSLCertificateFile /path/to/cert.crt
SSLCertificateKeyFile /path/to/private_key.key
# You got those from StartSSL
SSLCertificateChainFile /path/to/sub.class1.server.ca.pem 
SSLCACertificateFile /path/to/ca.pem

For the rest, you don’t need to change much except the path to the Diaspora repository you cloned with Git. Make sure you specify the path to the public folder, not the root folder, otherwise it won’t find all the CSS and images and such.

Also note that you’ll need mod_proxy, mod_proxy_balancer and mod_proxy_http loaded/enabled for this to work.

Running the pod

Holy shit. See, what did I tell you, that it was insanely complicated? Well, it’s not quite over yet.

Now you can at last run ./script/server, wait a bit, and go visit your brand new pod. If everything’s good, you should have a little “lock” icon in your address bar (and if you click on it, it tells you your domain is verified by StartCom Ltd.). You should also see the Diaspora welcome page.

Go and signup! It’s all yours!

When that’s done, you can go back to config/application.yml and set registrations_closed to true so that nobody else can create an account (if that’s what you want).

Kill the server with CTRL+C and, while it’s down, open the Rails console with bundle exec rails c.

Remember when I talked about the readline stuff? Well, if you didn’t do it well, that’s where it fails. If so, you’ll have to patch the readline gem like I had to.

Go to ~/.rvm/src/ruby-1.9.3-p125/ext/readline and then ruby extconf.rb, make, and make install. Make sure you’re using the same version of Ruby to run extconf.rb than the version you’re patching! (if you only have one Ruby installed, you don’t have to worry about that last detail).

Running the console is for adding your newly created user to the “administrators” role, so you can get access to the administration dashboard: go to this FAQ page and look for “Roles”. You should see a bunch of stuff you need to type in the console to make yourself an administrator.

When you’re done, start the server again with ./scripts/server.

Administration tips

On your pod’s website, in the top-right menu (where you have “Contacts” and “Log Out”) you should see a new entry called “Admin”. Click on it. The most useful page here is the last one: “Resque Overview”.

Resque is the background job manager, which takes care of a lot of important stuff for your pod. The overview page will show you, among other things, any failed jobs. This is useful to troubleshoot problems and send bug reports.

Another hidden page is at /admin_panel. This is the Rails panel dashboard, where you can basically hack into your database to fix things, compare values, or clean data. It’s a bit dangerous but can be useful at times.

Conclusion

That’s it! If you made it this far, congratulations, you have absolutely no life. You should, at this point, be able to send useless status updates to your so-called friends, with the warm feeling that comes with using open standards.

In the next post in this series, we’ll look at all the problems you will face with your Diaspora pod – and there are many, unfortunately.


The journey to Diaspora

Recently, app.net has gotten a lot of attention, but I just don’t see the appeal. It’s basically a Twitter clone that you have to pay, and all of this for what? So that the API is nicer to developers and you don’t see a couple of “promoted tweets” once in a while?

It sounds like a very shallow goal for a supposedly “disruptive” communication platform. Sure it has some kind of grand plan to get us to the next level of connectedness through, err, innovative apps and mashups or something. But it doesn’t make things better on the ownership level. It’s still yet another data silo. And I’m fed up with silos.

Remember when we used to communicate through free, open, distributed and standardized protocols? You know, like emails or phone calls? Or even snail mail? My problem with Facebook or Twitter is not that I’m the product, but that I don’t own my data, and that there’s no competition or choice between service providers. They’re not only data silos, but business model silos.

Other people also got fed up with the slow decline of the open and connected web, and started writing the building blocks for distributed social networks. Several projects emerged from this, with the most famous being Friendica and Diaspora.

  • Friendica: its main advantage is that it’s easy to install – like most PHP projects, you just copy files on your server, edit a configuration file, and follow the instructions on the web. You just have a couple of additional steps after that to setup your crontab so it can synchronize posts in the background. It also has very good interoperability with pretty much all the other social networks. The big problem, however, is that it’s batshit ugly. Also, as far as I can tell, it only allows bi-directional relationships, like Facebook, which means that if you want to “follow” somebody, you’ll have to send a “connection request”.
  • Diaspora: announced with much fanfare a while ago, it felt like vaporware for the longest time until it actually looked like they were shipping something. The selling point is a Google+-like “friendship” model, where relationships are asymmetrical and can be classified with “aspects” (Diaspora’s version of Google+’s circles). However, as we’ll see in the next post in this series, it’s insanely complex to install, full of bugs, and has poor performance. It also only allows to cross-post to select competitors (Facebook, Twitter and Tumblr).

With that in mind, Diaspora doesn’t seem to me like the best alternative to commercial social networks – it’s the only one so far. In this journey to Diaspora, we’ll look at:


Microsoft password fail

Almost 4 years ago, I wrote a short article on dumb websites who have a maxiumum password length.

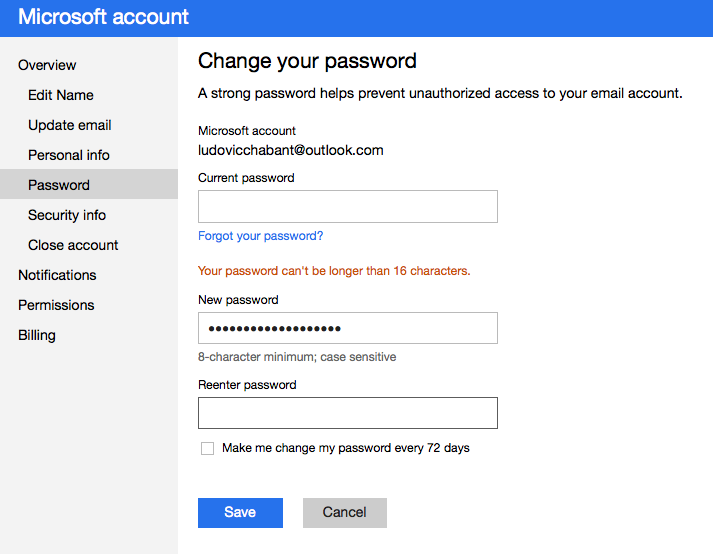
Now, in 2012, there are still websites with such stupid policies. One of the most famous is none other than Microsoft’s Live Account service, which serves as the authentication hub for all things Microsoft. Basically, your Live ID, or whatever it’s called, can’t have a password longer than 16 characters.

Microsoft is, rightly so, getting a lot of criticism about that because the recently released Windows 8 lets you link your Windows user to a Live ID, for use with the whole Windows App Store thing and more. This means, in most cases, that your Windows password can’t be longer than 16 characters, and, in other cases, that you have all kinds of weird account related bugs and you may need to enter a truncated password.

Oh, Microsoft.


When Windows “just works”: part 2 (the work around)

Back in the first part of this 2-part post we looked in some detail at how MacOS mounts network shares, and how badly designed this feature is compared to its Windows counterpart.

We’ll now look at the solution I’m using to fix the problem, which is to mount network shares in a consistent way for a multi-user machine.

The work around

Thanks to the power of UNIX, you can get around the problem by spending hours reading boring documentation, searching useless forums, editing obscure configuration files and generally speaking wasting your time for something Windows gets right in 2 clicks.

If you do the research, you will find lots and lots of solutions – some clever and some completely stupid. Not all of them worked for me, so here’s the solution I came up with. It uses the autofs feature supported by most recent versions of MacOS, and has some pros and cons. “Your mileage may
vary
”, as they say.

Creating custom mount points

Start by editing /etc/auto_master. It should look like the following, but without that last line. Add it using your favorite text editor (which you may have to run as root):

#
# Automounter master map
#
+auto_master		# Use directory service
/net			-hosts		-nobrowse,hidefromfinder,nosuid
/home			auto_home	-nobrowse,hidefromfinder
/Network/Servers	-fstab
/-			    -static
/-              auto_smb

Now create /etc/auto_smb and write something like this:

/Users/user1/Volumes/MyStuff -fstype=smbfs ://username:password@server/MyStuff
/Users/user1/Volumes/media   -fstype=smbfs ://username:password@server/media

/Users/user2/Volumes/SomeOtherStuff -fstype=smbfs ://username:password@server/SomeOtherStuff
/Users/user2/Volumes/media          -fstype=smbfs ://username:password@server/media

This file tells the automounter to treat the folders specified at the beginning of each line as mount points for the network shares specified at the end of each line. The file protocol I’m using is smbfs, which is the Windows file-protocol. You could try to use afp here, which is the Apple File Protocol, but I ran into permission problems on files I was editing or creating on my server. Also, depending on your server, smbfs may be faster.

I’m mounting my network shares in each user’s home directory, in a ~/Volumes folder, but you can mount them anywhere else – the whole point here is to have one “mount sandbox” per user instead of the system-wide /Volumes.

Also, here I’m specifying network shares with a custom username and password. You may not need that if you’re using the same credentials on both the local machine and the server. Of course, replace server with your actual server name or IP.

Once that’s done, run sudo automount -vc to tell the automounter to refresh. If it doesn’t work, you may have to create the ~/Volumes directory, along with the mount points themselves. I also ran into problems where the automounter would still be a bit confused and had to reboot to make things work, so you can try that as a last resort.

Accessing the network shares

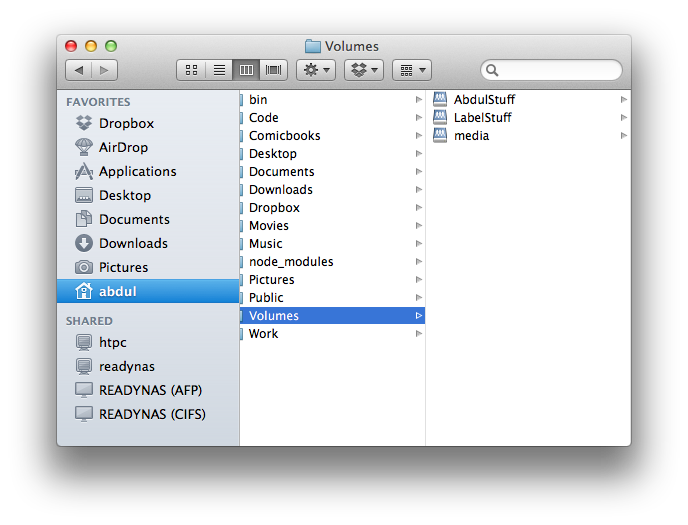
That’s the totally lame part: the mount points you created are not displayed in Finder until they are actually mounted. They will show up only after they’re mounted, which only happens when needed, i.e the first time they are accessed. So, at first, your ~/Volumes directory will be empty – at least in the Finder (if you go there using a Terminal, you will see the mount points, and you can cd into them, which would trigger the mount and make them appear in Finder! Yeah, it’s confusing, I know, welcome to the Apple ecosystem).

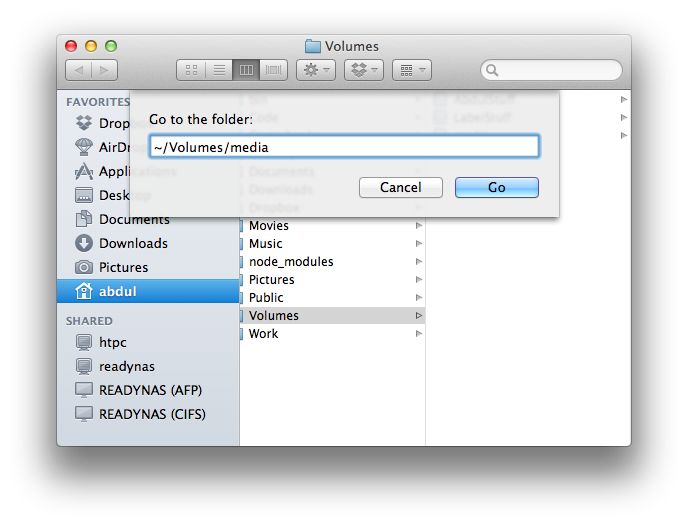
How do you access your network shares if you can’t see them in the Finder, then? Well you go directly to them with “Go > Go to Folder…” and enter, say, ~/Volumes/media:

You would only have to do this once in a while because once they are mounted, you’re unlikely to unmount them (you would actually need to use the command line for that). Also, once you gave that path to an application like iTunes or Lightroom, those applications can trigger the mount themselves by merely accessing the path: the next time you reboot and launch the application, it will all magically work (although you may notice a pause for a second or two as the system mounts the network share).

Alternatives

If you want the network shares to be visible in Finder as soon as you login, you can either:

  • Make a login item (a Bash or Apple script, for example) that will trigger the mount by accessing the path somehow.
  • Specify mount points in /etc/fstab instead of through the automounter.

I myself prefer staying with the automounter, because it means I won’t get a timeout when I log into my laptop but I’m not at home. Since I rarely reboot, it’s very uncommon for me to have to manually re-mount my network shares.

Conclusion

This is what makes it possible for me to use my home server along with sharing my Macbook with other users. It was a lot more complicated than I anticipated, but I guess making Macbooks play nice with custom servers would go against Apple’s new cash cow, a.k.a “iCloud”.


When Windows “just works”: part 1 (the problem)

If you asked me a year ago what was the most awesome feature that Windows has and that MacOS doesn’t, I would have probably scratched my head for a bit, mentally sorting through all the obscure advanced things you can do with the Windows SDK and a few lines of code, or all the little things that make organizing files so much easier than with the horrible Mac Finder.

But if you ask me now, I’ll reply straight away this: mapped network drives.

You would think there’s not much to it, but this has been my biggest problem as a user when I switched to a Macbook Pro as my main machine. In the first part of this 2-part post, we’ll look at the problem. Go to part 2 for the solution I’m using.

WTF is a mapped network drive?

In case you don’t know, here’s a little crash course in mapped drives. You can skip ahead if you’ve already used them.

Windows famously uses drive letters for each physical or logical drive hooked up to your computer. This means in most cases you would access your main system drive as C:, some secondary drive as D:, a USB thumbdrive as E:, etc. However, you can also be part of a network, and this means you would access a server’s shared directory as \MyServersharename.

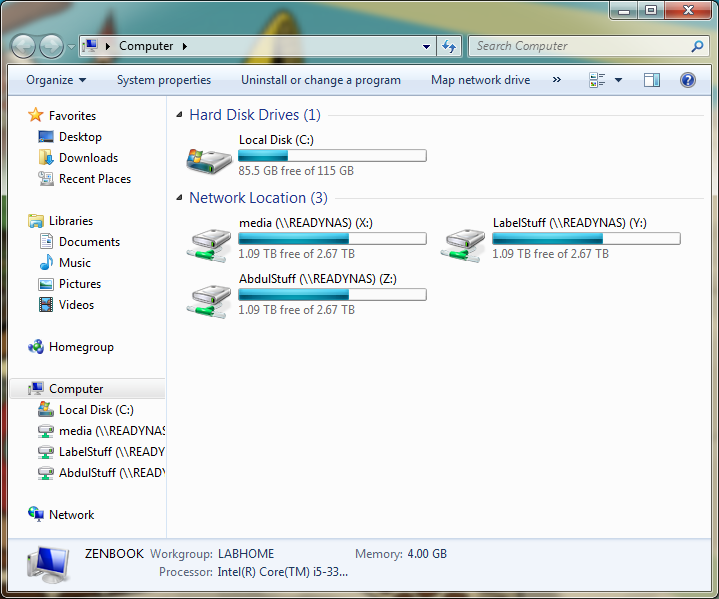
To make things simpler, you can map a server’s shared directory to a new drive letter like Z:. This is not an advanced feature. In fact, it’s always right there in the explorer’s toolbar when you open “My Computer”.

By the way, you can see here my typical setup at home, where I mount 3 shares from my file server: one for my personal data, one for the family data like pictures and home videos, and one for miscellaneous media like movies or music.

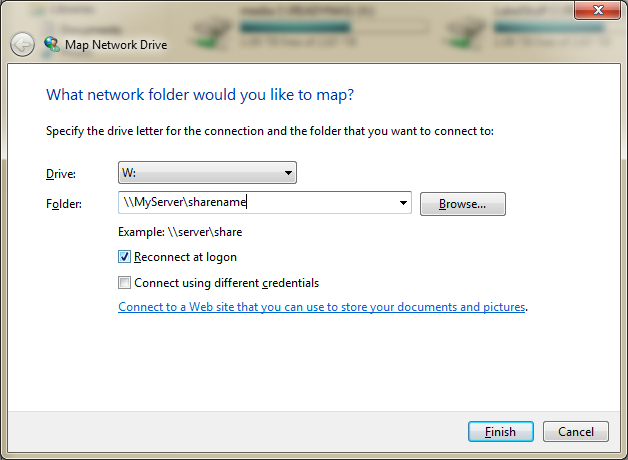
Setting up a mapped network drive takes about 2 clicks and a few keystrokes:

  1. Click on “Map Network Drive”.
  2. Type your server’s name and share name.
  3. Optionally enter specific credentials if the share is protected.
  4. Done!

At this point, you have a simple and convenient access to your server in a way that’s totally transparent to any application you may run. You can for example run a media manager like iTunes or MediaMonkey and tell it to look for music in Z:Music. It will always work – at least as long as you checked the “Reconnect at logon” option, and you’re of course connected to your network.

Doesn’t MacOS have something similar?

It does. Kinda.

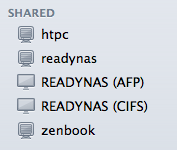
When you’re connected to your network, you will see the available servers in the “Shared” sidebar of the Mac Finder:

My server here shows up multiple times because it exposes several file protocols that MacOS understands (comparatively, out of the box, Windows only understands its own file protocol and not the Unix or Apple ones).

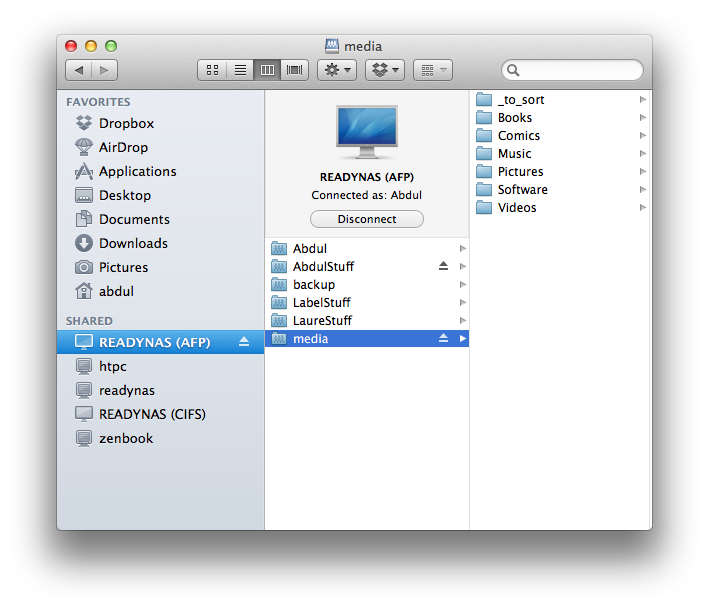
Once you click on a server, you can browse its shared directories that are available to you, and when you dive into one, it will “mount” it on our file-system. You can tell it’s mounted because the Mac Finder will show an “eject” button next to each mounted share, and next to the server itself. Here I mounted 2 shares:

Just like on Windows, the server share is mounted in a way that should be transparent to applications. So it should all work out fine, right?

Well, no.

Under the hood

MacOS is based on a UNIX-like architecture, so there are no drive letters involved here – only mount points that look like directories on the local file-system.

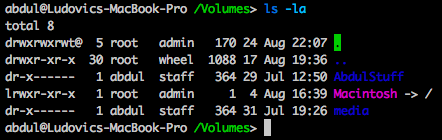
Sure enough, if you open a Terminal and go look into /Volumes, you’ll see the mount points for the stuff I mounted in the previous screenshot:

My media folder on my file server is mounted as /Volumes/media, and if I point an application like iTunes to it, that’s the actual path it will use behind the scenes.

The problem of multiples

What happens if another user (say, my wife) logs in and also wants to mount the media folder to listen to some music? Or what happens if you want to mount another share called media from another server?

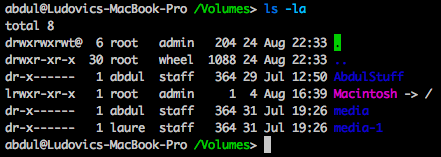
Well, MacOS, just like any other UNIX-based system out there, does something very stupid: it appends a number at the end of the mount point:

My wife’s media folder is, under the hood, mounted as Volumes/media-1. Other attempts at mounting something with that name will result in Volumes/media-2, Volumes/media-3 and so on.

Of course, this all depends on who mounts things first. If I was the one who logged on to the Macbook later, I would have been assigned media-1 when my wife would have media.

Compare that to Windows’ mapped network drives, which are user-specific, which means there’s no problem as long as you assign the same drive letter to the same network shares – which is a trivial thing to do.

Bad things happen

This is where things break down rapidly.

Did you originally, and unwillingly, tell iTunes your music was in /Volumes/media? Well, now your whole library is empty because it can’t access that directory – it either belongs to one of the other users, or it has been unmounted. Worse, it could actually point to a completely different share that you mounted from another server because it has the same name.

The same thing happens with your Lightroom pictures, your documents or presentations with embedded assets, and any other program that stores paths to some type of data you may have on a file server. All of a sudden, life is not worth living anymore.

The cynical in me tells me Apple doesn’t care about you if you’re sharing your laptop with someone else anyway – they’re not interested in cheap people – but it could actually happen even if you’re the only user: if there was a problem with the server, or with the network connection, well, let’s just say MacOS will be very happy to give up trying to mount your network share at its original mount point, and will instead do it with a new mount point, again with the number suffix. So you could end up with /Volumes/media-1 even if you’re the only user logged in.

Keep reading to part 2 for my work-around.


Catching up with CodePlex

For some reason, for the last year or so, I received occasional notifications about forum posts on my .NET projects over at CodePlex, but never anything about new issues being reported… well, I recently had a look at the issue tracker and found, horrified, that I had dozens of issues that had been sitting there for several months, untouched. Sorry about that. I guess the lessons are:

  • For me: check the notification settings on any code hosting website.
  • For CodePlex: maybe you guys could add the current number of open issues next to the “Issue Tracker” link in the navigation menu, just like what GitHub and BitBucket do.

Anyway, most of the bugs and feature requests were easy enough, and in a couple days I solved most of them (only 1 got rejected). This included mostly Textile.NET and IronCow. To celebrate this, I also got Textile.NET migrated to a Mercurial source control.


The Journey To Digital Comics: Manga Apps

In the previous step in the journey to digital comics we looked at american comics – my main source of graphical entertainment. This time, we’ll look at mangas and its derivatives (manhwa, etc.), which used to be my close second until I became too old to read about high-school girls, alien high-school girls, demon alien high-school girls, and miniature gender-swapping demon alien hunter high-school girls. But then I figured, fuck it, I’ll just look like a creepy old guy in the bus. No worries.

IMG_6354.jpg

A bit of history

Depending on how you look at it, digital mangas are either way beyond the american comics offer, or way behind. That’s because mangas and anime always had a vibrant “ethical piracy” scene, with scanlations and fansubbing. Most of the productions coming out from Japan or elsewhere in Asia historically, well…, never came out of there. It was impossible for fans anywhere else in the world to read those books or watch those TV shows. As a result, a community of translators, scanners and recorders was born.

That community was originally dedicated to supporting the original authors, however: whenever a specific series was licensed in the USA, the scanned manga or recorded TV series would be removed from the servers, and visitors would be gently redirected to the website of the company who licensed the product.

Of course, it didn’t take long for the community to branch up in several groups that would not necessarily follow that rule – whether it was because they catered to fans from other countries than the USA (there’s a lot of those) or to people who just want free shit (there’s even more of those).

Because of this pretty exhaustive free offer of digital mangas, the licensed and legal offer took a long time to materialize and, to this date, is still in its infancy.

As far as I know, the only available apps for legal digitial mangas on the iPad are Viz Media, Yen Press and Digital Manga Publishing (DMP). A couple more apps are available in the USA, like the Kodansha app, but not here in Canada – which shows how short-sighted some of those publishers are.

Some other publishers are at the bottom of the well. Square Enix, for instance, only offers to read your purchased book on your PC, as far as I can tell, and their website’s user interface is horrible – and I’m not the only one who thinks so. To give you an idea: it doesn’t even work in Google Chrome.

Worse, most of those previously mentioned apps are only available on iOS: only DMP’s app is available on Android. The other publishers’ books can sometimes be accessed via their website, but not always, which is bad. And when it is, it will mostly be Flash-based readers, which means that even on a good Android tablet your reading experience won’t always be optimal.

If that wasn’t enough, some publishers also handle purchases differently on the web and on the iPad, which means that the e-manga you bought may only be readable on one platform and not the other – this alone deserves a “worst idea ever” prize.

IMG_6359.jpg

You think it couldn’t get worse? Check this out: the Japanese Digital Comics Association is trying to reach out to its worldwide readers with an initiative called JManga. It’s a very nice idea: offer all their collective books through a unified web store… but if you go check it out, you will likely get a headeache – and also wonder if the website is legit because it looks like a spam/porn website run by Russian pirates. Also, as far as I can tell, there’s no iOS or Android app, which makes it useless (although some people are really dedicated to make it work).

IMG_6358.jpg

Overall, if you want a precise review of what apps are worth your time and money, you can read Manga Bookshelf’s “Going Digital” articles, like for example their “Manga on the iPad” wrap-up article from a couple months ago… but to be honest, I can’t find anything to be good enough at the moment.

The Viz Media app is the only promising one so far – it does what you expect, the interface is pleasant, the catalog is decent, and the prices are fair. The other apps, however, still suffer from various combinations of bad user experience, limited catalog, and digital mangas priced higher than their print counterpart.

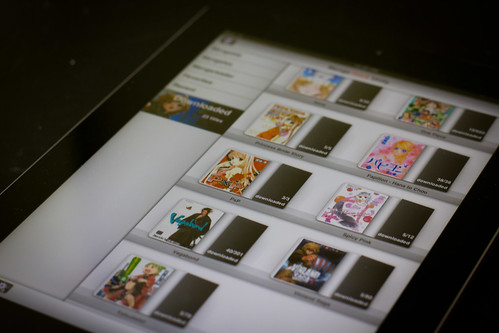
Now given the little history lesson I gave in the introduction, you’re probably expecting a lot of apps offering scanlations on Android, and none on iOS (because Apple would be censoring them, right?) Well, not really. For some obscure reason, Apple approved several dozen apps and never looked back.

IMG_6353.jpg

Maybe it’s because they want a good offer in terms of digital comics to boost the iPad’s value proposition. Maybe it’s because they don’t know about scanlations. Maybe it’s because the legal status of those apps is more subtle than what you’d expect. Go figure. The only thing I know for sure is that the whole idea of iOS having better quality apps because Apple reviews every one getting on the AppStore didn’t really work in that case: a lot of those apps are shitty-looking, have horrible usability, or both. And I’m not even talking about the crashes.

All of those apps, however, have something in common: they all get their books from the same sources, namely MangaFox, Mangable and Mangareader. This means they all have similar catalogs, with similar quality, so the only differentiator is the user experience.

IMG_6352.jpg

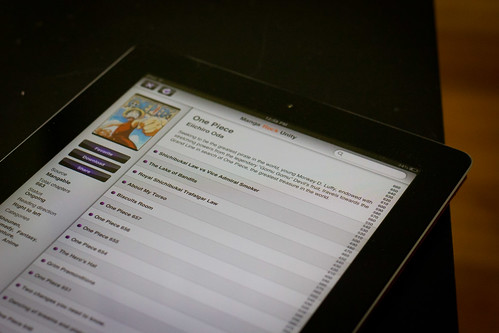
As far as the iPad is concerned, the best app in that category was, hands down, the “MangaRock” collection of apps from Not A Basement Studio. It’s a bit confusing at first, because there are 3 apps, and it’s not obvious which one does what, so I’ll save you the trouble of finding out:

  • MangaRock and MangaRock MF are mostly designed for the iPhone, and only download books from, respectively, Mangable and MangaFox. They’re free, however, and have an iPad layout, so you can try those first.
  • MangaRock Unity is designed exclusively for the iPad. It’s not free, but it pulls books from all 3 previously mentioned scanlation websites simultaneously, and has a better suited UI. This means it has a better user experience overall.

Conclusion

At the moment, there is absolutely no incentive or advantage for you to read 100% legal digital mangas except for the warm and fuzzy feeling of being honest and spending your cash. If that’s you, then try the Viz Media app and its web counterpart – none of the other ones are worth your time and money for now.

For the other series not owned by Viz, I couldn’t recommend anything else than MangaRock Unity or, you know, the legal dead-tree real-world-space-taking book. The quality of the average scanlation is usually well below that of an official e-manga, and the translations are, at best, full of typos, but it’s good enough, especially if you just want to try something before buying the printed book.


Mercurial’s onsub and mixed sub-repos

If you’re using Mercurial with mixed sub-repositories (i.e. sub-repositories handled by different revision control systems), you may be interested in this: I just got a patch accepted into the onsub extension.

The extension lets you run commands on your sub-repositories. For example, with my own dotfiles repository, running on Windows:

> hg onsub "echo I'm in %HG_SUBPATH%"
I'm in libhghg-git
I'm in libhgonsub
I'm in vimbundlebadwolf
I'm in vim/bundle/colorschemes
I'm in vim/bundle/commentary
I'm in vim/bundle/ctrlp
I'm in vim/bundle/easymotion
I'm in vim/bundle/fugitive
I'm in vimbundlegundo
I'm in vim/bundle/haml
I'm in vimbundlelawrencium
I'm in vim/bundle/markdown
I'm in vim/bundle/nerdtree
I'm in vimbundlepiecrust
I'm in vim/bundle/powerline
I'm in vim/bundle/ragtag
I'm in vim/bundle/repeat
I'm in vim/bundle/solarized
I'm in vim/bundle/supertab
I'm in vim/bundle/surround
I'm in vim/bundle/syntastic
I'm in vim/bundle/vimroom

As you can see, I’ve got quite a few sub-repos. However, some are Mercurial sub-repos, while others are Git sub-repos (that’s one of the nice features of Mercurial: it has decent interop with other RCSes). Which ones are which, though? That’s easy, there’s a new HG_SUBTYPE environment variable now:

> hg onsub "echo I'm in [%HG_SUBTYPE%]%HG_SUBPATH%"
I'm in [hg]libhghg-git
I'm in [hg]libhgonsub
I'm in [hg]vimbundlebadwolf
I'm in [git]vim/bundle/colorschemes
I'm in [git]vim/bundle/commentary
I'm in [git]vim/bundle/ctrlp
I'm in [git]vim/bundle/easymotion
I'm in [git]vim/bundle/fugitive
I'm in [hg]vimbundlegundo
I'm in [git]vim/bundle/haml
I'm in [hg]vimbundlelawrencium
I'm in [git]vim/bundle/markdown
I'm in [git]vim/bundle/nerdtree
I'm in [hg]vimbundlepiecrust
I'm in [git]vim/bundle/powerline
I'm in [git]vim/bundle/ragtag
I'm in [git]vim/bundle/repeat
I'm in [git]vim/bundle/solarized
I'm in [git]vim/bundle/supertab
I'm in [git]vim/bundle/surround
I'm in [git]vim/bundle/syntastic
I'm in [git]vim/bundle/vimroom

That makes it possible to do something slightly different depending on the sub-repo type, but it’s still tedious. For example, the most common operation for me is to pull and update all those sub-repos. The commands are different (hg pull -u vs. git pull) and doing an if statement in Bash or Cmd is cumbersome, especially as a one-liner argument.

That’s where the other new feature comes in: there’s a new -t/--type option that filters sub-repos based on their type:

> hg onsub -t hg "echo Mercurial subrepo: %HG_SUBPATH%"
Mercurial subrepo: libhghg-git
Mercurial subrepo: libhgonsub
Mercurial subrepo: vimbundlebadwolf
Mercurial subrepo: vimbundlegundo
Mercurial subrepo: vimbundlelawrencium
Mercurial subrepo: vimbundlepiecrust

This makes it easy to bring all the sub-repos up to date:

> hg onsub -t hg "hg pull -u"
> hg onsub -t git "git pull"

Hopefully it makes life easier for a few other people out there… it sure does for me!


Graphicly: Continually Evolving For Content Publishers

Graphicly just announced a dramatic change of direction:

In challenging ourselves to think broader and wider, we stumbled on a very simple idea: the best place to sell books is in a bookstore. It’s an idea that’s worked for hundreds of years in the real world, so why not extend that to the digital world. Additionally, with close to a hundred million installs of Kindle, iBooks, Nook and others (and not to mention the close to a billion Facebook users) it makes complete sense to provide a platform for publishers and creators to take advantage of those native marketplaces.

They’re basically dropping out of the digital comics store race to focus on helping publishers digitize their content and delivering it on existing, well-established digital stores.

It means I did well not to buy any books on Graphicly and recommending to always go through a publisher’s official store. However, it sucks for people who did buy books on their app. The Graphicly app won’t be available for download anymore, and unless you still have it on your tablet or phone, you will have to read your comics on the web reader. Since it’s not uncommon for a smartphone or tablet to have a problem that forces a factory reset of some sort, or for a user to upgrade to a new portable device, it means those previously purchased comics are lost — who wants to read comics in a browser, and how long until Graphicly eventually unplugs all those servers that only lose money?

Although I wish the Graphicly guys all the best, it’s a harsh reminder that digital goods, for all the advantages they have on traditional goods, come with a lots of problems when they are locked into an ecosystem (whether it’s with DRM or just web-service obfuscation). I hope that we’ll see the same kind of revolution we’ve seen with digital music — but in the meantime, it reinforces my opinion that you should use whatever means necessary to get yourself a personal backup of anything you buy online.