Ramblings of General Geekery

Announcing PieCrust 2

I’ve been busy on it for longer than I expected – neglecting the freshly announced Wikked along with several pull requests on PieCrust – but I believe it’s at last ready for a public alpha release: PieCrust 2 is here!

073/365 - Pi Day Pies, 2012

WARNING: before you go clone the new repository, be aware that, at the time of writing this, it has been tested on a glorious total of 2 machines (both my own), and 2 websites (both my own as well). So don’t use it in production, but please do give it a try and post bug reports, thanks!

This post is a short overview of the reason for going a full major version number up, and of the new things you can expect to find. There will be other posts in the following days about breaking changes and upgrade paths, and a more in-depth look at the new features.

Bye bye, PHP

To say that this is a major rewrite of PieCrust would be an understatement: I moved the project over to Python, which means it’s a 100% rewrite. This may upset some users who only know PHP (or at least don’t know and/or like Python)… but this is for the best, I assure you.

First, one of the design principles of PieCrust was always to look language-agnostic. Unlike many other static website generators out there, there’s no “leak” between the underlying implementation of PieCrust and the user experience, i.e. you’re not exposed to PHP-isms at any time while using it1. This makes it easy to change the platform on which it runs without you being affected much.

Second, the reason I picked PHP for the first implementation of PieCrust, more than 3 and a half years ago, is that it felt to me it was the lowest barrier of entry for potential users. Other static website generators embrace their hacker roots, but I wanted something simple enough that any WordPress user would be able to pick it up and try it. Nowadays, people are a lot more used to installing various things to tinker with – Git, Node, Ruby, whatever. The barrier of entry doesn’t seem to be so much at the platform level.

Those two reasons meant I could look at other platforms and figure out which one has what it takes for what I have in mind for the future of PieCrust.

Packaging and distribution

One thing that quickly became annoying in PieCrust 1 was package management (both PieCrust itself and its dependencies) and distribution (how people get PieCrust on their machines). Composer has been an incredible improvement over the venerable PEAR, but both are still a few extra steps away and more complicated than they should be.

Comparatively, gem, npm, and pip are a lot simpler and, better yet, come by default with Ruby, Node, and Python 3 respectively. Getting rid of my custom installer was an appealing thought. The PieCrust 2 install instructions would basically amount to:

  1. Install Python 3
  2. Run pip install piecrust

That’s much better, especially when you think that the upgrade path and hosting are all taken care of for me.

Performance

But it was performance that was the major reason I switched development platforms.

The problem was not that PHP itself was not fast enough – it’s actually doing OK in the overall category of interpreted languages. The problem is that, because it’s got so much usage as a web programming language, it’s lacking a lot of features as a scripting language. One of those features is an API for multi-threading2.

To be honest, I should have thought about it back when I started PieCrust, that I would eventually need parallel processing… but it’s never to late to change direction, which is what I’m doing with PieCrust 2.

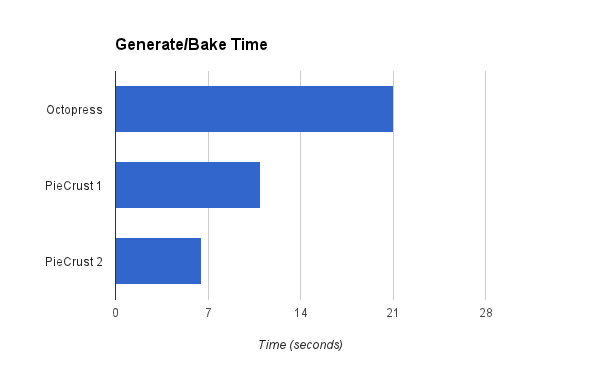
To give you an idea of how much this impacts performance, here’s a little graph. It shows the time it takes to bake my blog (the one you’re reading now!) using Octopress (the most popular static website generator around), PieCrust 1, and the newly written PieCrust 2. Obviously, shorter is better.

Octopress takes around 21 seconds3, PieCrust 1 takes around 11 seconds4, and PieCrust 2 takes around 6.5 seconds! And that’s even before I’ve made any optimization pass specific to this new codebase!5.

So yes, there is quite a substantial gain after the move to Python and parallel baking already. And that’s even before I can get into other improvements… for example, chef serve will be able to start a background thread to monitor changes to static assets on the file-system instead of checking for them when HTTP requests come in. This should make the preview server much snappier when you’re refreshing a page that has several images or CSS sheets.

Next post we’ll look at how you can upgrade your existing PieCrust 1 website to version 2, since I took the opportunity of a major version bump to clean up a few things I didn’t like anymore.


  1. Except for date formats. Sadly, date formats are very much tied to the
    underlying framework – unless you implement your own wrapper syntax – and this
    is one annoying breaking change when upgrading to 2.0. I’m open to ideas to fix
    that of course! ↩︎

  2. There are a couple extensions available to fill the gap, but they’re just
    terrible. ↩︎

  3. And that’s only for the posts on this blog, along with the tag pages, with
    simplified markup… my crude interop script strips out code highlighting blocks
    and other expressions (e.g. {{foo}} expressions). I’m
    expecting the real thing would take an additional second or two. ↩︎

  4. See how little it matters whether PHP sucks more or less than Ruby? Design
    and implementation are a lot more important for the big gains. ↩︎

  5. Most optimizations from PieCrust 1 were ported over to the Python codebase
    already. ↩︎


Wikked Performance

Since I announced Wikked here, I’ve been mostly working on fixing bugs, editing the documentation1, and evaluating its performance – which is what we’ll look at here today.

The big question I wanted to answer was how far you can go with just the default configuration, which is based on SQLite and requires no setup from the user. The reason for this was twofold:

  • I needed to write some advice in the documentation about when you should start looking into more sophisticated setups.
  • I plan to setup a public test wiki where people can try Wikked directly, and I needed to know if it would go down after I post the link on Reddit or HackerNews.

Initial assessment

The first thing I did was to figure out the current status of the code. For this, I took the first stress-test service I could find (which was Load Impact), and got my own private wiki tested.

  • This private wiki runs on the same server as this blog, which is a fairly under-powered server since almost all of my public websites are just static files, thanks to PieCrust: it’s a Linode VPS with only 512Mb of RAM.
  • The test requests a dozen different pages from the website, continually for around 10 seconds, with only a fraction of a second between each request. It increases the number of “users” running that test over time.

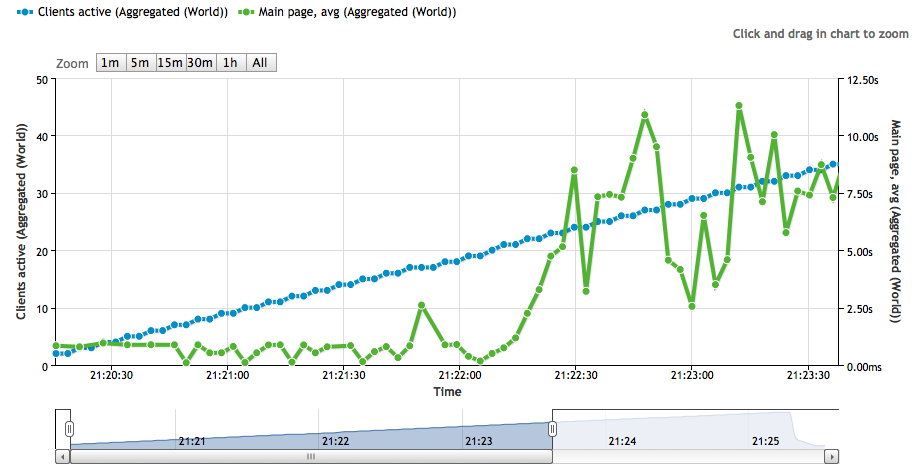
Here are some of the results:

As you can see, as the number of concurrent users increases, loading a page stays on average under a second, at 800ms. Then, around 20 concurrent users, things break down horribly and it can take between 3 and 10 seconds to load a page.

For a website running with SQLite on a server so small that Linode doesn’t even offer it anymore2, and designed mainly for private use, I think it’s pretty good. I mean, I initially didn’t plan for Wikked to run for groups larger than 10 or 15 people, let alone 20 people at the same time!

Still, I can obviously do better.

Request profiling

Werkzeug supports easy profiling of requests, so I added an option for that and looked at the output in QCacheGrind3. As I thought, pretty much all the time is spent running the SQL query to get the cached page, so there’s little opportunity to optimize the overall application’s Python code.

In Wikked, SQL queries are done through SQLAlchemy. This is because even though those queries are simple enough that even I could write them by hand, there are subtle differences in SQL dialects depending on the database implementation, especially when it comes to schema creation. I figured I would bypass the ORM layer if I need to in the future.

SQLAlchemy can be forced to log all SQL queries it generates, and that highlighted many simple problems. I won’t go into details but it boiled down to:

  • A couple of unnecessary extra queries, which came from my object model lazily loading stuff from the database when it didn’t need to.
  • Loading more columns than needed for the most common use-case of reading a page. Some of them would generate JOIN statements, too.

I also realized I was doing my main query against an un-indexed column, so I changed the schema accordingly… derp duh derp (I’m a n00b at this stuff).

Funkload

Now I was ready to run some more stress tests and see if those optimizations made a difference. But although Load Impact is a very cool service, it’s also a commercial service and I was running out of free tests. I didn’t want to spend money on this, since this is all just hobby stuff, so I looked for an alternative I could setup myself.

I found a pretty neat library called FunkLoad, which does functional and load testing. Perfect!

I started 4 Amazon EC2 instances, wrote an equivalent test script, and ran the test. To make it work, I had to install FunkLoad from source (as opposed to from pip), and troubleshoot some problems, but it worked OK in the end.

Without my optimizations, I got slightly better average page loads than before – probably coming from the fact that both my EC2 instances and my Linode server were on the west coast, whereas Load Impact was running from the east coast.

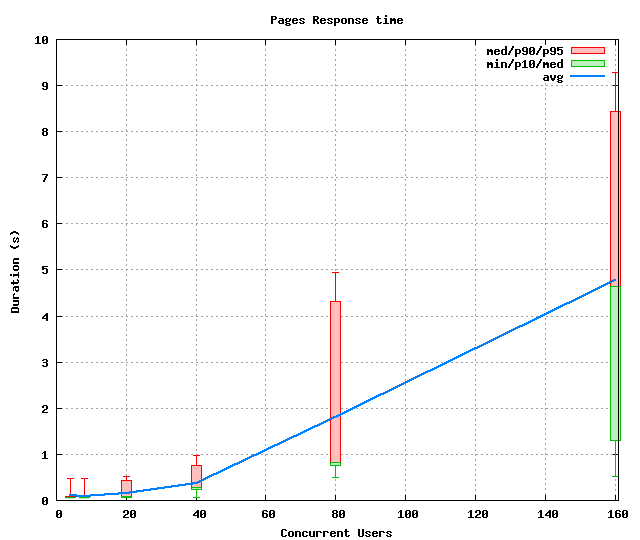
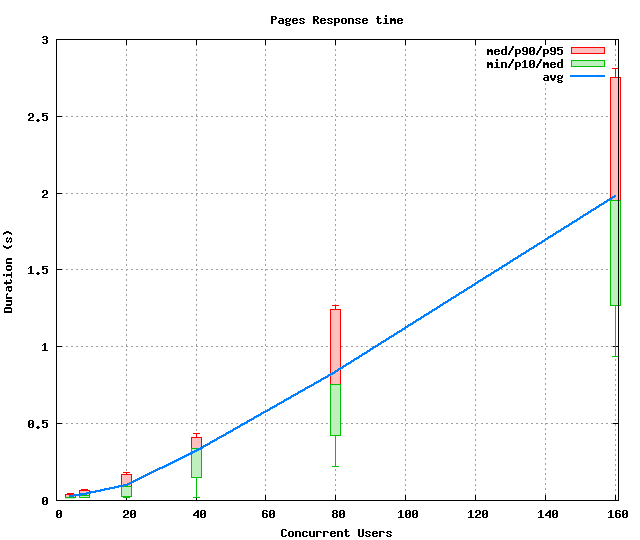
With the optimizations, however, it looked a lot better:

As you can see, Wikked on my small server can now serve 40 concurrent users without breaking a sweat: 300ms on average, and always less than 1s. And it could probably handle up to 50 or 60 concurrent users if you extrapolate the data a bit.

Moar hardware!

Next, I figured I would try to see if it made any difference to run the same setup (Wikked on SQLite) on a beefier server. I launched an EC2 instance that’s way better than my Linode VPS, with 3Gb of RAM and 2 vCPUs.

Well: yes, it does make a difference. This bigger server can serve 80 concurrent users while staying under the 1 second mark most of the time. Yay!

Conclusion

Those numbers may not seem like much but this is as good a time as any to remind you that:

  • I’m sticking to sub-1s times as the limit, because I like fast websites. But I could easily move the limit up to 1.5 seconds and still be within a generally acceptable range (e.g. from my home laptop, Wikipedia serves its pages in around 1.3 seconds).
  • This is about testing the most simple Wikked setup, based on SQLite, because that means the easiest install experience ever compared to other wikis that need a proper SQL server. And SQLite is notoriously limited in terms of concurrent access.
  • Serving even just 40 concurrent users is actually quite high. If you consider, say, 10 minutes per visit on average, that’s around 240 visitors per hour, or 1920 visitors per day if they’re all going to be mostly coming from the same time zone. That’s more than 50.000 visitors a month4.

Still, this is my first real web application, so there’s probably even more room for improvement. I’m always open to suggestions and constructive criticism, so check-out the code and see if you can spot anything stupid!

In the meantime, I’ve got some documentation to update, and a public test wiki to setup!


  1. It’s still missing a custom theme and a fancy logo, by the way. That will be coming as soon as I have any actual idea of what to do there! ↩︎

  2. That’s a referral link, by the way. ↩︎

  3. It’s not a typo. QCacheGrind is a Qt version of KCacheGrind, so that you don’t need to install KDE libraries, and it looks slightly less terrible. ↩︎

  4. The real issue is however how your site will behave if all of a sudden a lot of those visitors arrive at the same time. This is probably not uncommon if you have the kind of wiki where there can be announcements posted to a mailing list or a Facebook group, which can in turn get a lot of members to click the same link. ↩︎


Announcing Wikked

There hasn’t been any updates on this blog for a few months, and there was a good reason for that: I was working on someting new.

The problem is that I was trying to get this new project to a “good enough” state to launch publicly… but somehow I ended up in a seemingly infinite loop of improvements, refactorings, and bug fixing.

Eventually I snapped out of it: fuck it, let’s launch it as is, and see if anybody cares enough to complain that it’s not good enough. I wrote some basic documentation, fought with setuptools for packaging, and uploaded it to the Python package server.

Wikked

So lo and behold, here is Wikked, a wiki engine entirely managed with text files sitting in a revision control system.

I think it’s pretty cool, so come read more about it after the break!

Quickstart

You’re too lazy to follow the link to the documentation? Here’s your quick start:

pip install wikked
wk init mywiki
cd mywiki
wk runserver

Text files again?

Yes, this is “Part 2” of my personal crusade to both learn about web technologies and have all my data in text files inside Mercurial or Git. I find it so much easier to manage and backup than some piece of data trapped in an SQL database or something.

It’s obviously not a magic bullet – for one, it doesn’t scale well – but for personal websites I find that it’s perfect.

What’s next

The plan for Wikked is to stabilize it, of course: fix any bugs, make it easier to deploy, make it more configurable. I’m also expecting having to add proper support for Git, as right now only Mercurial is fully supported to store page revisions.

Then, it needs a demo website. There’s one already, actually, but I need to make it a bit more solid, like a cron job that resets it to its original state every night.

Last, I want to get some proper feedback about the Wiki Syntax. It was mostly thrown together as I found I needed something for my own wiki, but I’m still not 100% happy about it.

Fly away, monkeys!

That’s it for now. Be sure to send me some feedback, and to report bugs. Especially the part about reporting bugs, because this thing has never seen any other computer than my laptop and my VPS, so it’s pretty much the mother of all “works on my machine”.

Enjoy! 🙂


PieCrust 1.1

It’s been long overdue, since PieCrust 1.0 was released more than 4 months ago, but at last it’s here: PieCrust 1.1!

Pumpkin pie

Every time I figure I will go with a “release small, release often” kind of philosophy, I still end up with more of a “wait, I’ll just get this last feature ready first” kind of vicious circle… sigh.

Anyway, grab the new release, or keep reading if you want to know about the most important changes. As always, big thanks go to the people who reported bugs and/or helped fix them, or generally participated in the evolution of PieCrust.

Removing deprecated stuff

The first, most important change is that anything that was marked as deprecated, and that usually triggered a warning message if you used it, has been removed. So if you’re still using it, it will just break or, worse, silently do something else.

Make sure you don’t have any of those warnings before you update.

Self updating

If you’re running PieCrust from an installed binary (a .phar file), you will be able to update it easily with the chef selfupdate command… well, not this time (you’ll have to re-run the installer), but next time!

By default, the installer gets you the stable version of PieCrust so if you run the selfupdate command, it will always get you the latest stable. But you could also switch to the master branch (where things are in development) by running chef selfupdate master. Running selfupdate (with no argument) from now on would get you the latest master version until you switch back with chef selfupdate stable.

I hope this will encourage people to update more often, and to not be afraid to try things out on the master branch.

Also, it’s probably not working 100% so make sure you report any issues with the self-updater 🙂

Post iterator improvements

The post iterator, the thing you get when you want to loop over pagination.posts or site.pages, has a few new tricks:

  • Each page object that it returns now has access to the assets of that page. This is pretty handy if you want to display thumbnails or something.
  • The iterator itself now has a few “magic” functions to make simple filtering easier and faster to do. You can use is_foo(value) or has_foo(value) directly on the iterator to filter pages that have the foo setting set to value, or to an array that contains value respecively. This saves you from having to use filter() and define a filter in the header.

Temporary caching

You likely have something in your website layout that has to be computed for each page, but ends up being the same all the time during a single bake operation. To speed this up, there’s a new pccache operator that you can use.

Check out the documentation, with an example where it’s used to only compute a tag cloud in a sidebar once per bake. That example is incidentally from my own blog, and it cut the baking times in half… so yeah, I highly recommend it.

New baking infrastructure

PieCrust is now using a brand new system to keep track of what it’s baking now, compared to what was baked last time. This means that it’s now possible to delete files that we know we created last time, but are not valid anymore:

  • A page or asset that was deleted.
  • A page that doesn’t generate as many sub-pages as before.
  • A whole bunch of files that moved because the post_url, or some other URL-generation setting, changed.

Miscellaneous

A few other noteworthy changes:

  • The .md and .textile file extensions are now added to the auto_formats by default, which means any file (page or blog post) with that extension will be treated as Markdown or Textile respecitively.
  • The concept of “variants”, i.e. different versions of your website’s configuration, are now generalized to the whole of chef. See the documentation about it.
  • There’s no sample website anymore. If you’re feeling nostalgic, however, you can get back that ugly piece of blue as a theme.

That’s it! Grab the new version by re-running the installer, or getting the new source code from Github or BitBucket (where you can also report any issues).


PieCrust 1.0

PieCrust reached the big milestone of version 1.0 without much fanfare – and this post won’t be any different from the other release announcements. After a few release candidates I figured I would never be quite satisfied, so why not just keep going with the releases and not pay too much attention to the first digit.

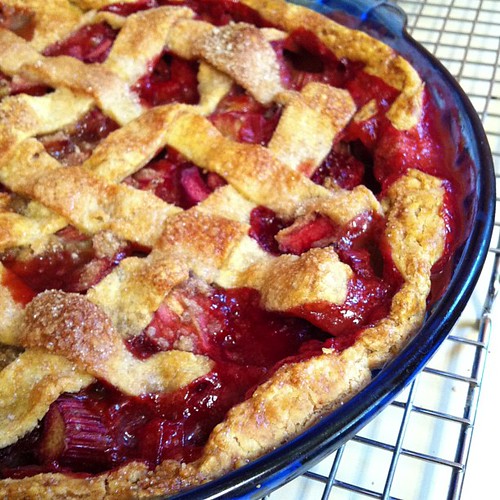
Strawberry Rhubarb pie #gluten-free

You’ll see releases 1.1.0 and up coming soon, with the usual bunch of fixes, changes, and new features. The only difference is that the version number will now reflect better what’s going on, since I’ll be loosely following the semantic versioning specification. In a nuthsell, the digit being incremented reflects whether a release is a bug fix, a non-breaking change, or a major and/or breaking change.

The one big new thing that comes with version 1.0 is an installer script, along with a .phar binary, to make it easier for people to use PieCrust if they don’t want or need the source code. Head over to the PieCrust documentation for more information.

For the rest of the changes, keep reading.

Auto-formats

One popular request has always been to make it possible for users to write pages and posts using other extensions than .html – most specifically .md or .markdown. This is now possible with the auto-format feature, which maps extensions for formats. As of 1.0, no auto-format is declared by default, so you have to specify the ones you want in your config.yml:

site:
    auto_formats:
        md: markdown
        markdown: markdown
        textile: textile

The example above maps extensions .md and .markdown to the Markdown format (same as if you specified format: markdown in the page’s config header), and extension .textile to the Textile format.

As of version 1.1, .md and .textile will be defined by default.

Template data changes

Some page template variables have been changed:

  • asset is now assets.
  • link is now siblings, and returns the page’s sibling pages (i.e. in the same folder).
  • There’s a new family variable that returns a recursive version of siblings (i.e. sibling pages and all the children pages in sub-directories).

The old names are still available, but will trigger warnings when you bake.

Feed preparation

The chef prepare command can now create more than pages and posts for you: you can run chef prepare feed and it will create a boilerplate RSS feed page for you.

You can specify --atom to create a boilerplate Atom feed instead.

Plugin update

If your website has some plugins, you can update them easily with the new chef plugins update command. Right now it will just stupidly re-download the plugins from their source, so it may re-install the same version, but that’s enough for now 🙂 It’s especially handy if you have some custom plugin that’s used by several websites.

Sass, Compass and YUICompressor

Speaking of plugins, the previously plugin-implemented Sass, Compass and YUICompressor processors are now part of the core PieCrust code.

They have also been improved in the process. Most importantly, Compass support is a lot better.

Miscellaneous changes

  • The monthly blog archives (blog.months) was incorrectly ordered chronologically, instead of reverse-chronogically. This is now fixed.
  • Anywhere that returns a list of pages or posts should now have consistent behaviour and features, e.g. filtering template functions.
  • You can get access to Twig’s debug functions by setting the twig/debug site configuration variable to true.
  • If you want PieCrust to use the Javascript lessc compiler to process LessCSS stylesheets, set the less/use_lessc site configuration variable to true.
  • Pretty colors for chef commands on Mac/Linux! (this is important)

For the complete list of changes, see the CHANGELOG.


Blog Archives in PieCrust

The question has come up a couple times already via email or Twitter, so here’s a quick recipe to write a nice looking archive page for your PieCrust blog.

There are 2 main types of blog archives: monthly archives and yearly archives. We’ll look at them one at a time after the break.

Yearly archives

This is the simplest one. Because PieCrust exposes your posts sorted by year in the blog.years template variable, you just need to loop on that with a for loop. Each object returned in the loop contains the following attributes:

  • posts: the list of posts for that year.
  • name: the name of the year (although you can also use the object itself, which is what we’ll do).

You end up with something like this:

---
layout: blog
title: Blog Archives
format: none
---
{% for y in blog.years %}
<h2>{{ y }}</h2>
<ul class="archive-list">
    {% for p in y.posts %}
    <li>
        <p>
            <a href="{{ p.url }}">{{ p.title }}</a>
            <time datetime="{{ post.date|atomdate }}">{{ p.timestamp|date('M d') }}</span>
        </p>
    </li>
    {% endfor %}
</ul>
{% endfor %}

Note how we render the date of each post with a custom format using the date filter (here using only the day and month). For more information about the date filter, check out the Twig documentation. Also, to provide a little bit of metadata, we use a time tag along with the atomdate filter, which is a handy shortcut for using the date filter specifically with an XML date format. Of course, you don’t have to keep that same markup – you can reuse the Twig logic but completely change the rest.

Monthly archives

This one is a bit more complicated. Although PieCrust also exposes your posts sorted by month in blog.months, you still need to spot changes in years so you can print a nice title or separator. To do this, we keep a variable curYear up to date with the current post’s year. If the post has a different year than the post before it, we print the new year in an h2 tag.

Each object in the blog.months has the following attributes:

  • posts: the list of posts in that month.
  • timestamp: the timestamp of the month, so you can render it to text with the |date filter.

So to get the year of each month, we use month.timestamp|date("Y"). To print the name of each month we use month.timestamp|date("F").

In the end, it goes something like this:

---
layout: blog
title: Blog Archives
format: none
---
{% set curYear = 0 %}
{% for month in blog.months %}
    {% set tempYear = month.timestamp|date("Y") %}
    {% if tempYear != curYear %}
        {% set curYear = tempYear %}
        <h2>{{curYear}}</h2>
    {% endif %}
    
    <h3>{{ month.timestamp|date("F") }}</h3>
    <ul>
    {% for post in month.posts %}
        <li>
            <a href="{{ post.url }}">{{ post.title }}</a>
            <time datetime="{{ post.date|atomdate }}">{{ post.date }}</time>
        </li>
    {% endfor %}
    </ul>
{% endfor %}

Again, feel free to keep the logic and change the markup to your liking – that’s the whole point of PieCrust!


PieCrust 1.0 RC

The past month has been pretty busy, between my next secret project, my day job, and of course fixing PieCrust bugs. But somehow among this chaos seems to be emerging a release candidate for PieCrust 1.0. And it’s only fitting that I announce this on Pi Day!

P365x52-73: Pi(e)

As always, for a complete list of changes, I’ll redirect you to the changelog. But for the highlights, please read on.

Big thanks go to the few people who contributed patches to the PieCrust code, and to the many who reported bugs and had the patience to help me fix them.

Breaking changes

First, the breaking changes. There are a bit more than I’d like, but most of them should not be a problem to 99% of users:

  • Chef’s command line interface has changed: global options now need to be passed first, before the command name. So for example, if you want debug output when baking, you need to type chef --debug bake.
  • The pagination.posts iterator can’t be modified anymore (i.e. calls to skip or limit or filter will fail). You can use the blog.posts iterator instead to do anything custom.
  • The xmldate Twig filter has been renamed to atomdate.
  • There was a bug with the monthly blog archives (accessed with blog.months), where they would be incorrectly ordered chronologically. They are now ordered reverse-chronologically, like every other list of posts.
  • The baker/trailing_slash is now site/trailing_slash, since PieCrust will also generate links with a trailing slash in the preview server, and not just during the bake, when that setting is enabled. The old setting is still available, though.
  • The asset template variable is renamed assets. The old name is still available.
  • Specifying a link to a multi-tag listing page is now done with the array syntax: {{pctagurl(['tag1', 'tag2'])}}. The previous syntax quickly broke down as soon as somebody decided to have tags with slashes in their name 🙂

All those changes should give you an error message that’s easy to understand, or have backwards compatibility in place with a warning telling you about the change. Look out for those.

Sass, Compass and YUI Compressor

Previously available as plugins, the Sass, Compass and YUI Compressor file processors are now part of the core. There were enough people mentioning those tools, especially Compass, that it made sense to include them by default.

The Sass processor is very similar to the one previously available in the plugin. In the site configuration, you can specify include paths with sass/load_paths, output style with sass/style, or any custom option to pass to the Sass tool with sass/options.

Compass support, however, has changed quite a bit, and should be now a lot better:

  • You enable it by setting compass/use_compass to true. This will prevent the default Sass processor to run on your .scss files.
  • If .sass or .scss files are found in the website, the compass tool will be run at the end of the bake. It will by default use any config.rb found at the root of the site. You can otherwise specify where your Compass config is with compass/config_path, or ask PieCrust to auto-generate it for you with compass/auto_config to true.
  • It may be a good idea to add your config file to the baker/skip_patterns list, so that it’s not copied to the output directory.

To enable the YUI Compressor to run on anything that outputs CSS, specify the path to the .jar file with yui/compressor/jar.

Linking feature now official

For a while, there was a link template variable that let you access other pages in the content tree. It was however never really official since I was still iterating on the design.

It’s now official, and available through the siblings template variable. It will return the pages and directories next to the current page.

To return the whole family tree starting from the current page, you can use family. It’s like a subset of site.pages.

Auto-format extensions

Another popular request is the ability to use different file extensions for pages and posts, like .md for Markdown content or .textile for Textile content.

This is now possible with site/auto_formats. This is a list that maps an extension to a format name:

site:
    auto_formats:
        md: markdown
        mdown: markdown

Here I’m mapping *.md and *.mdown to the Markdown format. Files found with those extensions will be treated as if they were .html files, but will also have their format set to markdown.

Feed preparation

If you write a blog, you most probably want to have an RSS feed. You can have one prepared for you with: chef prepare feed myfeed.xml. It will create a new page that has most of what you want by default. You can then go and tweak it if you want, of course.

Miscellaneous

A few other important changes:

  • All libraries (including Twig, Markdown or Textile) have been upgraded to their latest versions.
  • It is now possible to specify posts_filters on a tag or cateogory page (_tag.html or _category.html).

PieCrust on Heroku

When I first decided to work on PieCrust, I settled with PHP as the language – even though it mostly sucks – in an attempt to make it broadly available. Anybody who runs a blog on WordPress should be able to switch and enjoy the perks of plain text data without needing to install and learn a whole new environment.

That doesn’t mean PieCrust can’t also be used in the nerdiest ways possible. A while ago we looked at how cool it is to update your website with Git or Mercurial, and today we’ll look at how you can host it on Heroku, which incidentally also supports Git-based deployment.

Today's latte, heroku.

If you already know how Heroku works, then the only thing you need is to make your app use the custom PieCrust buildpack. Skip to the end for a few details about it.

For the rest, here’s a detailed guide for setting up your PieCrust blog on Heroku, after the break.

1. Sign up and setup

This is pretty obvious but it’s still a step you’ll have to go through: sign up for a Heroku account and install their tools. Follow the first step to login via the command line, but don’t create any app just now.

2. Create your PieCrust website

For the sake of this tutorial, let’s start with a fresh new site. You will of course be able to use an existing one, the steps would be very similar.

Let’s create one called mypiecrustblog:

> chef init mypiecrustblog
PieCrust website created in: mypiecrustblog/

Run 'chef serve' on this directory to preview it.
Run 'chef bake' on this directory to generate the static files.

Let’s also add a post, just to be fancy:

> chef prepare post hello-heroku
Creating new post: _content/posts/2012-12-03_hello-heroku.html

Last, turn the site into a Git repository, make Git ignore the _cache directory, and commit all your files:

> git init .
Initialized empty Git repository in /your/path/to/mypiecrustblog/.git/
> echo _cache > .gitignore
> git add .
> git commit -a -m "Initial commit."

By the way, you can quickly check what the site looks like locally with chef serve. We should be able to see the exact same thing online in a few minutes when it’s running on Heroku.

3. Create your Heroku app

Now we’ll turn our site into a Heroku app. The only difference with the documentation on the Heroku website for this is that we’ll add an extra command line parameter to tell it that it’s a PieCrust application:

> heroku create mypiecrustblog --buildpack https://github.com/ludovicchabant/heroku-buildpack-piecrust.git
Creating mypiecrustblog... done, stack is cedar
BUILDPACK_URL=https://github.com/ludovicchabant/heroku-buildpack-piecrust.git
http://mypiecrustblog.herokuapp.com/ | git@heroku.com:mypiecrustblog.git
Git remote heroku added

What’s happening here is that, in theory, Heroku doesn’t know about any programming language or development environment – instead, it relies on “buildpacks” to tell it what to do to set up and run each application. It has a bunch of default buildpacks for the most common technologies, but it wouldn’t know what to do with a PieCrust website so we need to provide our own buildpack, with that --buildpack parameter.

If you already created you app previously, you can also make it a PieCrust application by editing your app’s configuration like this:

heroku config:add BUILDPACK_URL=https://github.com/ludovicchabant/heroku-buildpack-piecrust

We can now push our website’s contents to Heroku:

> git push heroku master
Counting objects: 3, done.
Writing objects: 100% (1/1), 185 bytes, done.
Total 1 (delta 0), reused 0 (delta 0)

-----> Heroku receiving push
-----> Fetching custom git buildpack... done
-----> PieCrust app detected
-----> Bundling Apache version 2.2.22
-----> Bundling PHP version 5.3.10
-----> Bundling PieCrust version default
-----> Reading PieCrust Heroku settings
-----> Baking the site
[   171.7 ms] cleaned cache (reason: not valid anymore)
[    46.4 ms] 2012/12/03/hello-heroku
[    21.3 ms] [main page]
[     2.2 ms] css/simple.css
-------------------------
[   247.3 ms] done baking
-----> Discovering process types
       Procfile declares types    -> (none)
       Default types for PieCrust -> web
-----> Compiled slug size: 9.5MB
-----> Launching... done, v7
       http://mypiecrustblog.herokuapp.com deployed to Heroku

To git@heroku.com:mypiecrustblog.git
   1180f39..e70c271  master -> master

At this point, you should be able to browse your website on Heroku (http://mypiecrustblog.herokuapp.com in our case here).

You now just need to keep adding content, and git push to make it available online.

Appendix: The PieCrust buildpack

The PieCrust buildpack we’re using in this tutorial will, by default, bake your website and put all the generated static files in the www folder for the world to enjoy.

If, however, you set the heroku/build_type site configuration setting to dynamic, it will copy the PieCrust binary (a .phar archive) to your app’s folder and create a small bootstrap PHP script that will run PieCrust on each request. This would make deployments very fast, as you won’t have to wait for the website to re-bake, but it’s highly recommended that you use a good cache or reverse proxy for anything else than test websites.

Note that the version of PieCrust that’s used by the buildpack is, by default, the latest one from the development branch (default in Mercurial, master in Git). You can change that with the PIECRUST_VERSION environment variable. For example, to use the stable branch instead, you can do:

> heroku config:add PIECRUST_VERSION=stable

For more information about the buildpack, you can simply go check the source code over on Github.


Themes in PieCrust

I just pushed a lot of changes to the dev branch of PieCrust, including the new support for themes. The point of themes is to make it easy to change your website’s appearance by further separating content and look.

Here’s an early look at how themes work, so that anybody can play with it and provide feedback. Not everything is in place yet, so now’s the best time to affect the design.

The theme folder

When a website is using a theme, that theme will be placed in the _content/theme folder.

The theme itself is really just another PieCrust website: it has its own _content folder with pages and templates and everything you expect. The only differences are:

  • The configuration file is named _content/theme_config.yml instead of _content/config.yml. This is so chef is not confused as to what’s the root of the current website when you go into the theme folder.
  • A theme should have a theme_info.yml file at the root of the theme. It’s a YAML file with, at minimum, a name and description.

The theme behaves as follows:

  • Pages defined in the theme (in _content/pages, like any other PieCrust website) are added to the base website, unless a page with the same URL has been defined there. It makes it possible for themes to define pages like an “About” page or some blog archives. They effectively complement the website on which the theme is applied.
  • The theme’s templates directories (site/templates_dirs setting) are added before the default _content/templates directory, but after any other custom directory defined by the website. It makes it possible for themes to override the default templates, and for users to override a template defined in a theme.

The themes command

A new themes command is available in chef. It looks a lot like the plugins command in the sense that is offers the same 3 sub-commands: info, find and install. Right now, however, there are no themes in the default repository, so chef themes find won’t return anything, which means there’s no theme to install.

You could setup a local repository by setting site/themes_sources to /path/to/my/themes, where that path contains one or more themes in sub-directories. You can then install one of your local themes by running chef themes install <name>, which basically just copies the theme inside _content/theme.

For faster development, however, I would recommend just sym-linking your theme’s root directory to _content/theme.

Quickstart

To summarize, here’s how you can write a theme for PieCrust at the moment:

  • Create a PieCrust site as usual.
  • Rename _content/config.yml to _content/theme_config.yml.
  • Add a theme_info.yml file at the root. This is a YAML file, just like
    config.yml.
    • Give it a name.
    • Give it a description.
  • Write pages, templates, CSS stylesheets and so on.
    • It’s a good idea to implement standard pages like _index.html,
      _tag.html and _category.html.
    • It’s also good to implement standard templates like default.html and
      post.html.

When you’re happy, symlink – or copy – the theme’s directory to a website’s _content/theme directory. Play around by adding new pages and posts to that site.

As always, report issues on the BitBucket or Github issue trackers.


Piecrust 0.8.0

The 0.8.0 (and even 0.8.1!) version of PieCrust has been tagged in the stable branch.

mum's lemon meringue pie

As usual:

  • I still need to write some documentation on the new and/or changed features.
  • I’m really not good at keeping a single release focused around a small set of consistent new features. I tend to pack different unrelated features mixed with bug fixes as they come to me, and the result is a bit messy.

You can read about the changes in the CHANGELOG, or keep reading for a detailed description of the highlights. Or you can just go and grab it from BitBucket or Github and trust me that it’s awesome! (but wait, you should at least read the first couple sections here below because there are a few breaking changes).

New folder structure

As we get closer to a 1.0 release, I changed the folder structure to make it look more like a genuine application. It used to look like an already installed system (a _piecrust folder with the code and a sample website folder), which was nice during early prototyping and development. Now, however, it doesn’t feel right anymore, especially since chef has evolved into a sophisticated tool.

So the folder structure now has a bin folder with chef, the usual src, libs, tests folders, and a single piecrust.php file to include at the root.

For backwards compatibility purposes, the important files are also available at their old location (chef and piecrust.php) but they will issue a warning message if you use them from there. They will be removed when we hit version 1.0.

Broken stuff

There was a few things that didn’t quite make sense that I also fixed, unfortunately resulting in breaking changes:

  • When pretty_urls are disabled, pages with pagination will have the same first page URL as if they didn’t have sub-pages (e.g. foo/bar.html). Sub-pages will have URLs like foo/bar/2.html. This makes URLs more consistent.
  • PieCrust now supports extensions other than .html for pages. Before, you had to make all files in _content/pages with an .html extension, and use the content_type configuration setting in the header to change the output to something else, like .xml or .rss or whatever.
  • Now, you can actually create files like _content/pages/feed.xml and it will be handled correctly. This means content_type is now only meant for setting HTML response headers in CMS mode, which makes more sense.
  • Some chef commands had some inconsistently named options: some would have hyphens, some would have underscores, and some would just concatenate words together. I don’t know why I never noticed it until now… In most cases, the old option name is still available, but will issue a warning that it will be removed when we hit version 1.0.

Multiple formats

Thanks to the magic of open-source, PieCrust now also supports changing the format of a page right in the middle of the content. This is useful when you’re using a minimalist format like Markdown and just need that extra feature at one point to control some CSS or HTML property without having to write it all verbatim:

So here I am, writing some stuff. It's all _nice_ and _fun_.

But then, I need to write a boxed piece of text that will be laid out nicely with CSS. Let's use HAML!

<--haml-->
.boxed_text#tutorial1
  .left.column
    :markdown
      This is some **cool stuff** right here!
  .right.column
    :markdown
      Hey, this is nice too!

<--markdown-->
Ok, back to normal, now. **Whew!**.

This example obviously uses the PhamlP plugin (which adds the Haml and Sass languages), but you should get the idea.

Also, if you want to start a content segment using a different format than the one defined for the page, you can append the name of the format you want to use like this:

---newsegment:textile---
Another content segment using **Textile** formatting!

Templating features

The iterators obtained through pagination, blog.posts or link have a few new tricks:

  • You can sort posts and pages with a new .sortBy(foo) function. Here, foo is the name of a configuration setting in the pages’ or posts’ headers that will be used to order those pages or posts.
  • You can now access the content segments of pages and posts you’re iterating on – not just metadata like title and date.
  • You can use paginagion.all_page_numbers to get, well, all the page numbers for the current page. You can also use pagination.page(i) (where i is a number) to get the link to a specific page. This will help you build pagination footers more easily.

Portable baking

The --fileurls option to chef bake used to bake a website with absolute local paths for all links created with the pcurl family of template functions. This made it easy to just bake a site and double-click on the main page to preview it locally without any web server.

It was also flawed, because it meant the site could only be previewed in that exact place on the file-system – you couldn’t give it to a colleague or client to review.

A new option, --portable, effectively replaces the --fileurls option (which is now deprecated). It will create relative links (with lots of ../ in them) so that you can move the baked static files around and still have them previewable locally in a browser.

Debug info in CMS mode

For people running PieCrust in dynamic CMS mode, you can set site/enable_debug_info to false in the site configuration to disable the ?!debug feature, which could potentially expose private information to visitors.