I myself had some fun letting Google write stuff for me. Just start with an arbitrary word, and keep accepting whatever the first suggestion is. The UI slows down quite a lot after a dozen or so auto-completions, so sometimes you need to delete the last space and type it again to get some performance back.
For example, here’s what I got after seeding their algorithm with “I’m”:
I’m not sure if it is not a valid stream resource in C minor for Piano and Orchestra No. 1 in the world of the living room and dining room with a view to share videos with friends and family to enjoy a good meal and a drink for the first time in the future and the future of the world and the world of the living room and dining room with a view to share videos with friends and family to enjoy a good meal and a drink for the first time in the future and the future of the world and the world of the living room and dining room.
Obviously, the algorithm quickly loops like crazy, and the sentence doesn’t quite make sense, but it’s pretty funny (at least to me!). Now, here’s what I got when starting with “You”:
You can turn Autoshare off at any time and without notice to you and your family to enjoy a good meal and a drink for the first time in the future and the future of the world and the world of the living room and dining room with a view to share videos with friends and family to enjoy a good meal and a drink for the first time in the future and the future of the world and the world of the living room and dining room.
That’s pretty interesting, as the looping is very similar to the first one!
Now, here’s what I got when starting with “let’s”:
Let’s see if we can not guarantee each coupon ‘s authentication and authorization data between security domains and do not want to be related to the search result can be bookmarked to maintain the filter for future use at Recent Searches for neutral Higgs bosons in e minor for clavichord and the harpsichord and the clavichord and the harpsichord and the clavichord and the harpsichord and the clavichord and the harpsichord.
This time, the loop is short and kinda catchy. The harpsichord and the clavichord! The harpsichord and the clavichord! The harpsichord and the clavichord! Maybe that’s gonna be the next internet meme?
Everybody knows, or at least says without really knowing, that Facebook has a few privacy issues, but there’s one thing I never quite realized until recently…
It all started with my friend Bertrand opening his new personal blog. He wanted a dedicated place to post personal stuff, which he previously posted alternatively on his professional blog or on Facebook. I’m pretty sure he also wanted an excuse to play around with his new cool baby, Orchard… Anyway. In order not to start completely from scratch, he imported those previous articles he wrote, along with their comments, to the new blog.
I immediately sent him an email to tell him he could work at Google Buzz, seeing how he just disclosed Facebook comments to the public… but as I was writing it, I wondered… were his notes already public in the first place? You see, Facebook gives you a lot of control over your content’s visibility. You can specify exactly who gets access to what, who gets to comment on what, etc. The problem is that, although the content creator knows what the privacy settings are, the content consumers don’t. Being on Facebook, I just assumed that those notes were, at best, visible to friends of friends… but of course, it wasn’t the case. Bertrand’s notes were public all this time, and as I commented on them, I unknowingly posted completely public stuff.
None of those comments being public bothers me, mind you. But it’s just annoying how, when you participate in your friends’ online social life, you don’t really know what kind of privacy level you’re dealing with. Obviously, Facebook should add some kind of indicator whenever you post a comment, telling you who will be able to see it. I’m surprised this hasn’t been such a big deal so far. Maybe people are too busy with “Company XYZ is evil!!”-type generalities to bother with actual details.
I recently had to build a little tool that would read its configuration from a XAML file (because XAML serialization is, most of the time, better and more customizable than standard XML serialization). The trick was that this tool had to be built on top of .NET 3.0 – not 3.5 or 4.0. And I discovered that there are a few little gotchas in .NET 3.0’s XAML serializer that I, somehow, never ran into before.
Pretty straightforward… however, if I try to deserialize it from a XAML file, I get the following exception:
property ‘Foo.Values’ cannot be set because it does not have an accessible set accessor. Line ‘3’ Position ‘4’.
I thought the framework was high on drugs or something, as what I wrote was pretty much the main use-case for the DesignerSerializationVisibility attribute. But then I remembered this other little gotcha with property reflection: when you use the auto-property syntax from C# 3.0 for a read-only property, the PropertyInfo you get on that property says you can write to it. This is because there is a setter method – only it’s private. And that’s why the XAML serializer complains about accessibility.
Note that this has been fixed with the new XAML serialization in .NET 4.0, with the new System.Xaml namespace. But if you need to target a previous version of the framework, you’ll need to refactor your code like so:
Now you may think that the XAML serializer would be happy, but no… this is a very picky serializer! The next exception you get is:
‘Values’ is a read-only IEnumerable property, so ‘ConsoleApplication2.Foo’ must implement IAddChild. Line ‘3’ Position ‘4’.
That’s obviously weird, because the property is actually a list. But my guess is that the serializer is only looking for the ICollection interface. And the problem is that IList<T> does not implement that interface – it implements ICollection<T>, sure, but neither of those generic interfaces implement the “legacy” interfaces. That why most of the time you’re better off writing a proper collection class that inherits from Collection<T>, or some other base class from the System.Collections.ObjectModel namespace, because they implement both the generic and “legacy” interfaces… but sometimes you may not feel like writing an “IntCollection” class, right? Well. Life sucks.
Oh, and don’t bother actually implementing the IAddChild interface, or making the list itself implement that interface, it’s useless, you’ll get the same exception. That interface is some kind of weird leftover from the beta phase of WPF, and is now half-deprecated, half-internalized, as mentioned on that MSDN forums thread.
So basically, in our case, a quick fix would be changing the public interface to a List<int>.
After those few changes, the XAML serializer is happy and running fine!
You know how it goes: you’re an internet hipster with blogs and Twitter feeds and all that kind of new age stuff, but only other internet hipsters read them. Your friends (at least the ones that are not internet hipsters) only stick to Facebook. So how can you bring your stuff to them?
At first, it seems easy: Facebook can pull “stories” from various websites and services. Go to your profile, and under the status update box, click “Options” and then “Settings”. You get the following interface:
That’s cool for most people. You bring in your Flickr photos, and your blog articles, and maybe a few other things… but what happens if you’ve got more than one blog? The “Blog/RSS” site can be only chosen once. Also, notice how you can choose Google Reader as a story source. Sure, this works, but the way your shared items appear on your wall is not optimal: they appear as “secondary activities”, presented like your comments or likes, sometimes merging several ones together which adds extra clicks to get to the actual article (e.g: “Ludovic shared 2 new items on Google Reader”, with only a link to your shared items page, which means you don’t know which 2 items were shared, as they may not be the last 2 ones if there have been other, newer ones since then). At least it was like that a few months ago (maybe they fixed it in the meantime, you tell me). That’s not proper spamming, so let’s do it the power user way.
A few years ago, Yahoo launched Yahoo! Pipes, a website that lets you build feed mashups. I decided to use that to aggregate all my stuff and post it on my Facebook wall.
It’s pretty simple, at first. You just go to the Yahoo! Pipes website, log-in, click “Create a pipe”, and add one source node for each site you want to pull data from. You’ll most probably use “Fetch Feed” nodes with the direct URL to your blogs and shared items RSS or Atom feeds, but you can also use some “Fetch Site Feed” nodes, too (they will find the actual feed URLs like any feed reader would do). Now pick the “Union” node from the “Operators” category, and plug all your sources into it. Plug the “Union” output into the “Pipe Output” node that should have been created by default for you. Voilà, you have an aggregated feed that you can import on your wall on Facebook!
Or do you?
One problem you’ll notice right away is that all the items from the first feed are displayed, and then all the items from the second feed, and so on… The “Union” node only built a, well, union of those feeds. You need to re-order them by date so that all the items from all the sources are correctly mixed together. For this, add a “Sort” node, as shown above, that will sort items by “item.pubDate”.
There. Fixed? Nope… not yet.
Now you have a user experience problem. All those items appear as “notes” on your Facebook wall, with their contents directly readable. If you’re pulling feeds from your own websites and feeds from elsewhere at the same time (e.g. your Google Reader’s shared items feed), it becomes difficult for your friends to figure out which stuff was written by you, and which stuff is just cool shit you found on the web and wanted to share. You need to create a differentiator, like for example prepend “Shared on Google Reader:” in front of each of your shared items’ titles.
I’m still evaluating different options but at the moment I’m using something a bit less user-friendly, although definitely more friendly to the websites from which I share stuff from: I completely replace the contents of the item with a link to the actual article on its original website. This means that people can’t read the item right there (they need to click on the link), but it also means the people who posted the cool shit in the first place get a visitor that will potentially start clicking around on links and ads if he linked whatever I shared.
For this I created a different pipe, although I could have hard-coded it in the first one.
This pipe basically gets my Google Reader shared items feed and processes it in a loop: for each item, I replace the contents with a link whose text is just the title of the item. Inject this new pipe into the first one (you can reference a pipe inside another pipe) and, at last, you’re done!
The only problem I’ve had so far is that, after adding my aggregated feed to Facebook for the first time, the mobile version of the website did something funky. Instead of weaving all those notes into my friends’ timelines, moving the older items behind the more recent updates from other people and applications, it put everything it could at the top. So basically, I really spammed all my friends with dozens and dozens of items that were several weeks or even several months old. This bug didn’t affect the normal website, neither did it affect the iPhone application, as far as I could tell, so I only got a couple complaints. And hopefully they fixed the bug since then.
That’s pretty much it. You can find the 2 pipes I showed here and here.
Programmers in the video games and movies industry rarely write unit tests for all kinds of reasons and excuses, but every now and then, it happens. And it can get a bit complicated when you want to test a plug-in hosted by a 3rd party application like Autodesk’s Maya.
The good thing is, unlike most other 3d modeling packages, Maya comes with built in “batch” and “library” modes. The batch mode effectively runs Maya as a command line program, and the library mode allows you to host most of the Maya core engine inside your own application. This means that, as long as you’re not using anything that depends on the existence of the UI, it’s possible to run automated tests.
Once you’ve created your unit test project using your favourite test framework (lately I’ve been using boost::test), you want to initialize Maya in a minimalist environment (most probably in a test fixture setup phase). You can do that by pointing the MAYA_APP_DIR environment variable to a custom folder of your choice, which would contain a custom Maya.env file, along with maybe a few custom startup scripts. The goal is obviously to not load your complete production environment with all your 3rd party plug-ins. You also probably want to set the MAYA_PLUG_IN_PATH and MAYA_SCRIPT_PATH variables to point to the output or deployment folder(s) of your test project. This can even be done programmatically with the Maya API using MCommonSystemUtils::putEnv, as long as it happens before you initialize the engine.
When you’ve got the correct environment, you can call MLibrary::initialize and wait for an excruciatingly long time (somewhere between 20 and 30 seconds). Ideally, I’d like to start with a fresh Maya engine for each test suite (or even each test!), but given how long it takes for the library to initialize, that’s not an option and I do it only once on start-up. Between tests, I merely clear the scene with a “file -force –new” MEL command. I know you can severely strip down Maya by telling it to not even load the default plug-ins (e.g. if you’re testing something that doesn’t need rendering and animation and skinning and all that, you can in theory not load those features), but I haven’t bothered looking into that yet. If you have, I’d love to hear about it.
Anyway, all this, along with some nice helper functions for checking things in the scene, is pretty much enough to get you going… until you write your first “fail” test, i.e. a test that ensures that a given situation returns the expected error code or throws the expected exception.
The MStatus problem
You see, the problem is that, if you’re a bit paranoid like me, you’re probably using a lot of CHECK_MSTATUS macros around your code to make sure you’ll notice early if anything is not going as expected (the Maya API, being old as it is, doesn’t use exceptions, so if you don’t check return codes regularly you could go a long way with invalid objects, which increases the chances it’ll do some harm to your users’ data). When these macros are passed a non successful MStatus, they print a message to the standard error output. This pretty much means you’ll see that message printed in the terminal window as your unit test runs. That’s fine, but in the case of your fail test you don’t want that to happen because you only want to see unexpected error messages printed in the console.
Looking at the code for those CHECK_MSTATUS macros, one can see that they use the STL’s std::cerr to print the beginning of the message, and then call MStatus::perror to print a user-friendly description of the error. Being naive, I’m thinking “good, I just need to temporarily capture std::cerr!”. So I wrote the little following structure:
BOOST_AUTO_TEST_CASE(TestThatSomethingFailingDoesntScrewUpTheRest)
{
    // Do something
    initializeStuff();
    {
        CAPTURE_ALL();
        callSomethingThatWillFail();
    }
    // Check that even with the failure, the data in the scene is still ok.
    checkStuff();
}
It won’t take you long to realize that only the first half of any error message printed by CHECK_MSTATUS has been captured. “No worries”, I thought. “They probably print the other half with a good ol’ fprintf, so I’ll capture stderr too!”.
Well… I tried a few different things, from a few different sources, but none of them worked. At best, it didn’t do anything – the error code description would still get printed. At worst, it would seemingly work but would then render the whole program unstable (most of the time it would crash on the second attempt to capture the error output). I don’t know what Maya is using to print that MStatus out, but it sure isn’t a straightforward fprintf.
Now, before moving on to my (somewhat disappointing) solution, let’s look at another MStatus problem.
The CHECK_MSTATUS_AND_RETURN_IT problem
One of the CHECK_MSTATUS macros is CHECK_MSTATUS_AND_RETURN_IT, which checks for any error and, if found, will make the current function return that very same error. A typical use of it would be:
MStatus doSomethingSimple();
MStatus doSomethingMoreComplicated()
{
// Do stuff
CHECK_MSTATUS_AND_RETURN_IT(doSomethingSimple());
// Do more stuffreturn MStatus::kSuccess;
}
The problem is that this macro is implemented as such:
Do you see? It calls CHECK_MSTATUS_AND_RETURN which, if the first status is an error, returns the second status. This means that if the call to doSomethingSimple fails, the macro will call it a second time to get the return value!
This is obviously bad… (and another example of why C++ macros can be evil because it’s not obvious what you can and cannot pass into them).
At first I defined a CHECK_MSTATUS_AND_RETURN_IT_SAFE macro that did the correct thing, but for various reasons I decided to just redefine the original macro and prevent other programmers from making that mistake (at least as long as the my header file was included, which is easier to enforce, especially if you’re using things like pre-compiled headers):
Now what does this have to do with the error message problem?
Well, now that I was already redefining one of the CHECK_MSTATUS macros, I figured it wasn’t much more trouble to redefine them all (there’s only a handful of them). The only thing you need to do is replace the call to MStatus::perror with a line that sends the MStatus into std::cerr. I mean, MStatus already has operator<< defined for IO streams, so it’s not like I had to do anything more than some copy/paste and changing one line.
So there you have it: my crappy solution for having clean Maya unit tests was to redefine the CHECK_MSTATUS macros so they use the STL’s IO streams. Do you have a better or more elegant solution? I’d love to know about it!
Understanding how it really works, and how to supply your own custom Main() method, is just a search query away. You basically need to change the application’s build action from “Application Definition” to “Page”, create a constructor that calls “InitializeComponent”, and write your Main() by eventually calling one of the application’s “Run” method overloads.
Don’t forget, also, to remove the “StartupUri” from the App.xaml, otherwise another copy of window will show up (unless you get an error because the URI points to a non existing XAML resource).
What most articles won’t tell you, though (some of them actually getting it wrong), is that it’s important that you create the application before you create your first window. To illustrate this, let’s add an application resource to App.xaml:
It’s a style that makes buttons red. Since it’s defined at application level, all buttons in all the windows should be red (except those that define their own local style override). For example, here’s the markup for my Window1:
<Windowx:Class="WpfApplication1.Window1"xmlns="http://schemas.microsoft.com/winfx/2006/xaml/presentation"xmlns:x="http://schemas.microsoft.com/winfx/2006/xaml"Title="Window1"Height="300"Width="300"><Grid><Button>Is This Red?</Button></Grid></Window>
We should see a window with a red button in it. But when I run the project, I get this:
Well… it’s not red.
The issue is that the window is created before the application. This means that when it queries the current application to get the globals resources, it finds nothing. What you need to do is simply create the application first:
[STAThread]
staticvoid Main()
{
App app = new App();
Window1 window = new Window1();
app.Run(window);
}
By simply switching those two lines, you get the expected result:
This drove me crazy for an hour or so – I thought there was something funky going on with my theme management code or something. Hopefully this will save someone some pain.
Everybody knows that Gmail is great for consolidating multiple email accounts into one place that’s easy to search, organize, backup, and get out of. What less people know is that it’s also a great place to consolidate your instant messenger accounts, too!
Watch out, this article is pretty long and gets quite nerdy at the end.
We’re going to talk about merging accounts from different instant messaging services (Gtalk, MSN, ICQ, etc.) so let’s get this out of the door first: yes, I could use programs like Pidgin or Trillian to log into all those networks simultaneously, but I’d still have to search in at least two places when it comes to past communications, and that’s without considering problems like chat history being only stored locally on one computer, which means I then have to sync that with my other computers using Dropbox or Mesh. Also, it’s really way to simple for my tastes. There’s a better, more complicated and geek-fulfilling way.
Google made the very good decision of using Jabber, a.k.a. XMPP, an open protocol, to implement their own instant messaging system Gtalk. As usual with Google, though, they didn’t quite follow the standard entirely but it’s compatible enough for what I need… mostly. The other good thing with Google is that they integrated the whole thing into Gmail so that chats are searchable along with emails, which is what I’m after, here. Some people may be uncomfortable with the privacy implications, but those people probably don’t use Google services anyway (why would you trust them with your emails or videos or pictures but not chats?). In fact, people worried about privacy probably don’t use many web services in general, unless they’re one of those weirdoes who actually read the whole terms of services and really compare them (I don’t even know if such weirdoes exist). Besides, when you start worrying about privacy, you generally end up setting up your own email server, which then makes you worry about other things like backup, whitelisting/greylisting, encryption, etc… Anyway.
So what then? Well, the XMPP protocol has things called “transports” who basically translate to and from other IM networks like MSN, Yahoo and others. That’s the way we’ll consolidate all our IM networks into Gmail!
There are a few tutorials out there that explain how to set that up, so I’ll quickly walk through the first steps and then get to what I did differently, which is the good part.
Setting up Psi IM
Go and get Psi, a cross-platform instant-messenger client that has one of the most complete feature sets out there when it comes to Jabber magic.
Create an account in Psi that will connect to Gtalk. You can follow one of the previously linked tutorials for that, or Google’s own instructions. Apart from the login/password, it mostly comes down to the following settings:
If you’re using Google Apps, you’ll also have to add a few records to your DNS zone file. The instructions are provided by Google (you obviously need to replace “example.org” with your own domain):
_xmpp-server._tcp.example.org. 28800 IN SRV 5 0 5269 xmpp-server.l.google.com.
_xmpp-server._tcp.example.org. 28800 IN SRV 20 0 5269 xmpp-server1.l.google.com.
_xmpp-server._tcp.example.org. 28800 IN SRV 20 0 5269 xmpp-server2.l.google.com.
_xmpp-server._tcp.example.org. 28800 IN SRV 20 0 5269 xmpp-server3.l.google.com.
_xmpp-server._tcp.example.org. 28800 IN SRV 20 0 5269 xmpp-server4.l.google.com.
_jabber._tcp.example.org. 28800 IN SRV 5 0 5269 xmpp-server.l.google.com.
_jabber._tcp.example.org. 28800 IN SRV 20 0 5269 xmpp-server1.l.google.com.
_jabber._tcp.example.org. 28800 IN SRV 20 0 5269 xmpp-server2.l.google.com.
_jabber._tcp.example.org. 28800 IN SRV 20 0 5269 xmpp-server3.l.google.com.
_jabber._tcp.example.org. 28800 IN SRV 20 0 5269 xmpp-server4.l.google.com.
At this point, you should be able to chat through Psi without anything new compared to Gtalk besides the warm fuzzy feeling of using a non-Google open-source client to do so.
This is where the previously mentioned tutorials make you connect to 3rd party servers running those “transports” in order to get access to the other IM networks. And this is also where I find the limits of my trusting nature. First, I don’t like giving my credentials for one service to another service. Second, I kinda know who’s behind the services I use on a daily basis (mostly either one of the big three, Microsoft, Google, Yahoo). On the other hand, I have no idea who’s running those Jabber servers (judging from their main websites I’d say it’s a mix of geeky individuals, bored IT technicians, universities, and shady businesses). I don’t really want to give any of those guys my Windows Live or Yahoo passwords… which is why I decided to run my own private Jabber server! (see? I told you it would be geeky and overly complicated!)
Running your own Jabber server
The idea is to run your own Jabber transports so that there’s no 3rd party involved in your communications – only you, your friends, and the IM networks used in between.
Before we go into the tutorial, I’d recommend that you first set up the DNS records for the domains and sub-domains you’ll use for your server, because that will take a bit of time to propagate through the internet and you don’t want to test anything by using some temporary URL or the server’s IP (I’ll tell you why later). In my case, all I needed was an address for the server itself, and another one for the only transport I need so far, an MSN gateway. So I created type A records for “xmpp.mydomain.org” and “msn.xmpp.mydomain.org”.
At first I tried setting up jabberd2 but I found it to be a bit too cumbersome (why does it need 4 services, 4 configuration files, and 4 logs?) and difficult to troubleshoot. I ended up using ejabberd, which had more informative logs and documentation. Note that at this point, I don’t care about performance or scalability since this server will only be for me and maybe a couple of family members.
Setting up ejabberd was pretty easy since you only need to follow their guide, which tells you to add your server domain to the hosts list in ejabberd.cfg:
{hosts, ["xmpp.mydomain.org"]}.
If your server is behind a router, you’ll need to open ports 5222 and 5223 for client connections (standard and legacy SSL), 5269 for server connections, 5280 for HTTP requests, and 8010 for file transfers.
At this point, you should be able to go to the “Service Discovery” window in Psi, type your server’s address, and see a bunch of exposed services (although they will likely be disabled). The example below uses flexion.org which is not my server (I’ll keep it private, thank you very much), and shows a slightly different list of services than a default ejabberd installation… but the important thing is that you know your server is online, with the proper domain.
If it doesn’t work the first time, check ejabberd’s log file (making sure the configuration’s logging level is appropriate for errors and warnings). Your Jabber server may have trouble finding DNS information for your account’s servers (talk.google.com, mostly). In this case, the solution can be found on ejabberd’s FAQ. I used the 3rd listed solution, which is to add the IP addresses of nameservers like OpenDNS to the inetrc configuration file:
Now at last we can download and install PyMSNt, which seems to be the most widely used MSN transport (oh, and it’s pretty much the only one, too). Once again, follow the installation guide, which will ask you to install Python and Twisted. PyMSNt will actually run in its own Python process, talking to the main Jabber server service via TCP.
PyMSNt’s configuration file, aptly named config.xml, only needs a couple of modifications for the transport to work: set the JID to your transport’s sub-domain (e.g. msn.xmpp.mydomain.org) and set the host to the same value. However, the tricky thing is that if your server is behind a router, the host value should instead be the IP of that machine on your local network (something like “192.168.x.x”).
Then, you need to edit ejabberd’s configuration file to add an entry in the “{listen” section:
Restart ejabberd, fire up PyMSNt, and you should see some entries popping up in ejabberd’s log about an external service getting connected, and a new route registered for server “msn.xmpp.mydomain.org”.
Go back to Psi, look at your server’s services again, and you should see an MSN transport available there (the example below uses the jabber.dk server, which actually exposes 4 MSN transports!):
If all is good, you should be able to right click your MSN transport and choose “Register”. You’ll be asked to enter your Windows Live ID, which is all good because that will end up on your own server (and in plain text! Good thing it’s ours, eh?). Then, you’ll be asked to authorize the transport to register itself in your roster.
You should now see, in Psi, a new entry for your MSN transport in your contact list, under the “Agents/Transports” group. You should also pretty quickly start receiving authorization requests from all your MSN contacts. Since there can be a lot of them, you could, just before authorizing the transport, go into Psi’s options to enable “Auto-authorize contacts” (don’t forget to disable it later). Also, don’t worry, it’s only some handshaking stuff on the Jabber side of things – your friends won’t know what you’re up to, except that they’ll probably see you appear and disappear every 5 minutes for a couple hours while you’re testing 🙂
Getting all your contacts in line
Once your contacts are imported, you can casually chat with them and check that they don’t suspect anything. On your side, though, they all have ugly names… things like:
john_doe%hotmail.com@msn.xmpp.mydomain.org
It’s pretty easy to figure out… the first part is their IM handle (here, a Windows Live ID), with “@” replaced by “%”, if any. The second part is “@server.com” to turn this into a proper Jabber ID.
What I recommend doing, at this point, is to rename all your contacts in Psi to give them the same names they have in your Gmail address book. Then, close Psi, go to your Gmail contacts, and use the “find duplicates” feature. It will merge the new contacts (who have only that one weird Jabber ID as their email address) with your existing entries. It should also make those contacts appear as expected in your chat widget, or in Gtalk.
Note that all your contacts’ Jabber IDs are tied to your own Jabber server. This means that if you want to replace a transport by using another one from a different server, you’d get a whole new batch of contacts with IDs ending in the new server’s name. It’s a bit annoying, as it forces you to do some address book management to clean up the old unused IDs, and that’s why I said earlier that it wasn’t a good idea to start testing your server using a temporary URL or an IP address.
Some assembly required
If you’re in the same situation as me, not all of your contacts will show up in Gtalk. Actually, at first, only 2 of my MSN contacts showed up. I had no idea why, but I suspect some funky stuff going on with the very peculiar way Gmail decides who to show in your chat list based on how often you communicate with them (you can somewhat turn that off in the web widget by telling it to show all contacts).
In the end, I removed and re-registered with my MSN transport a few times through Psi, and each time I’d see more online contacts in Gtalk. Go figure…
There are a few other glitches. For example, every time I login with Psi, I get a message through the transport about how I should update to the latest Live Messenger to get new features. I don’t get that in Gtalk, but it’s probably because it doesn’t support messages from transports. Other glitches included problems connecting to the MSN servers or missing avatar pictures, but this is all fixed if you take the latest code from PyMSNt’s repository.
One big drawback, however, is that there doesn’t seem to be a way so far to backup the chat history you have on the cloud. Hopefully, Google will someday extend their data freedom philosophy to Gtalk, but in the meantime, using Psi (or some other similar client) exclusively is the only way to have a copy of your logs. But then again, if that was a big concern, you probably didn’t use Gtalk in the first place.
So far I’ve been using this setup for a week, and it works well. I’ll post an update after a month or so.
Visual Studio Express only has a subset of what you can find in Visual Studio Professional, which makes complete sense, but two missing features actually prevent users from following best programming practices in my opinion. The whole point of Express is to let enthusiasts and students discover the joys of programming – so we might as well let them do it the proper way.
The first limitation is not being able to set an external executable as the “start action” when you debug. In Express, you can only run the debugger on an application project (console, UI, or web application). You can’t set a library project to be the startup project, nor can you attach the debugger to another process. This means that if you want to debug your unit tests, the unit test project must be an executable.
Thankfully, most unit testing frameworks have a console bootstrapper that you can use as your console application’s main loop, but it’s not ideal, and it probably doesn’t incite many people into writing unit tests because they have to figure all this out. More importantly, it breaks down when you can’t create console applications at all, like when you develop with Silverlight (although .NET 4’s assembly compatibility with Silverlight 4 may make things smoother here).
A way to get around that would be to use add-ins like TestDriven.NET, but Express also has a limitation that it doesn’t support add-ins (this actually got TestDriven.NET into some trouble at some point). Other ways to get around it would be to access Visual Studio’s command window, or drive it with VB macros, but Microsoft closed those “exploits” with Express 2008.
The only way to get around those limitations is to use the .NET Framework’s CLR debugger, which ships with the SDK and is a stripped down version of the Visual Studio shell featuring only the debugging features. The problem is obviously that it’s a bare bones debugger that’s completely disconnected from the IDE experience.
The CLR debugger is also the only way to get around the second of Express’ limitations… You’ve probably already encountered a program that does heavy processing on the UI thread instead of in the background, resulting in sluggish user interaction, progress report, and lack of a button for cancelling the operation. Well, it’s pretty difficult to implement it otherwise with Visual Studio Express, because it doesn’t support multi-thread debugging.
Sure you can put breakpoints in code that will run on different threads, and it will break correctly, but you won’t be able to access the “Threads” debug window because there’s none. This means you won’t be able to look at what’s running at the same time, so it’s pretty useless… and it’s a shame because the framework makes it so easy to use thread pools and background workers and such.
It seems critical to me that Microsoft add those missing features to Visual Studio Express as they expand the open-source .NET community with their own projects. It should be as easy as possible for anybody to participate – not just people with a $1200 MSDN subscription. But the reality is that most of those open-source projects aren’t usable on anything else than the Professional versions (which opens up another debate regarding the culture of the .NET community, but that’s for another time). Of course, people could still use other IDEs like SharpDevelop, but then what’s the point of having those Express editions? I’m sure Microsoft would be happy to keep all those students leaning on Windows and Visual Studio – as they should. So if Microsoft is committed to a free, functional and educational version of Visual Studio, I think they would have to fix the feature set appropriately.
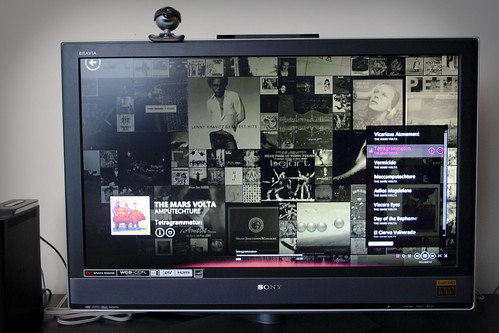
I was working on this article when I spotted that my friend Bertrand Le Royposted on that very same subject so I’ll turn this into a reply to his. The new year seems like a good time for bragging about one’s home video setup, it seems.
First, you may notice that my setup is quite simple because I don’t have any audio gear. Yet. That’s because until recently, my apartments were too small for me to have any decent speakers.
I’m still using an HD PVR (bottom left in the photo above) provided by my cable & internet provider, unlike some people who built their own PVR or cancelled their cable subscription altogether. The reason is that up here in Canada, we don’t have a lot of options for streaming or downloading legal content yet. It’s particularly frustrating because we get channels like NBC and such that proud themselves in telling you, at the end of the show, how you can go on their website to watch episodes you missed… only to get a cold “sorry, this content is not available in your country”. Anyway…
So I have an HD PVR for recording shows. I never, ever, watch live TV. Having to wait through commercials is too painful. I’m looking forward for the time when there will be no TV channels anymore – just direct subscriptions and downloads from content producers, similar to how we don’t listen to music through the radio anymore. Well, some people still do, but I don’t, and that’s made possible by the new platforms. Now if only a Zune Marketplace could open in Canada… but I digress again.
Media Center PC
For the digital content we do have access to in Canada, and for my growing collection of converted DVDs and CDs, I have a Media Center PC.
Similarly to how I don’t watch live TV anymore, I’m in the process of not watching real DVDs anymore (all my CDs have already been converted a long time ago). Because yes, it takes too much time to locate the correct case, open it, remove whatever disc was previously in the tray, locate that other case, put the disc back, put the case back, put the new disc in, load it up, wait through the incredibly enraging and often non skippable segments including very long logo intros, anti-piracy shorts, and sometimes even commercials, and then wait for the stupid main menu animation to finish so you can click on “Play Movie”. I prefer to just locate what I want to watch in a list and press “OK”, thank you very much.
Wow, I keep digressing. Sorry.
Hardware
So this, above, is my Media Center PC (you can spot it at the bottom right in the first picture). I built it last spring, and if you want all the facts, here’s what’s inside the Antec Fusion V2 case:
Zotac motherboard with a GeForce 9300 chipset and (among other connectors) HDMI output.
Intel Core 2 Duo CPU at 3.06GHz.
4Gb RAM.
Seagate Momentus 5400.6 160Gb (this is a laptop 2.5” hard drive, for minimum noise).
Lite-On iHES106-29 DVD/Blu-Ray.
Logitech Cordless Desktop S520 Wireless Keyboard and Mouse.
For roughly the same price as a Mac Mini, I get a bit more power, more RAM, a Blu-Ray drive, 1080p HDMI output, wireless keyboard and mouse, an IR receiver that works with any remote, and the freedom to upgrade it over the next years (what I don’t get is WiFi or customer support though). Sure, the Antec case is huge and not so sexy, but it’s quiet as hell. The fridge from the kitchen is noisier than the PC, actually.
Oh, God, this is one beautiful piece of software. And it becomes truly awesome when you slap a skin like Aeon on it (although I need to upgrade and checkout the new 9.11 default skin).
I’ve been using XBMC for several years, all the way back to my original modded XBox, and although I sometimes look back, I never find any other similar program that’s even half as good. XBMC is just the right balance between a user-friendly “it just works” and an open-source “tweak the hell out of it”.
For my music, I prefer to use the Zune Software as a player. This is another beautifully designed program – at least in the graphic department. It just makes any other player look like an ugly Excel spreadsheet.
To manage my music library, however, the best thing I’ve found so far is MediaMonkey. This program alone, which I bought in “gold” version, is the reason I don’t have a Linux installed on my Media Center PC. It makes it easy to manage and maintain a huge music collection when you’re obsessive about tags, album covers and file names.
Other programs include Boxee, which is useful for some things but not quite as appealing outside of the US.
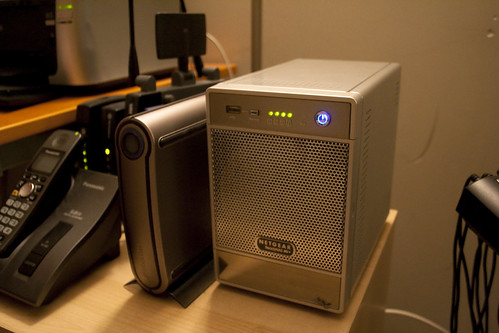
File Server
The Media Center PC itself doesn’t store any data beside its OS and programs. All the data (music, pictures, videos) is stored on a Netgear ReadyNAS NV+ with four 1TB hard drives in RAID (which gives me around 2.7TB of space).
Note the USB hard drive next to it. It receives daily backups of the important data… but I’ll probably write another post sometimes about my data storage and backup strategy (it’s an even geekier bragging subject!).
The ReadyNAS has a decent community going on, and since it’s running some kind of Linux, it’s easy to mess around with it if you’re not afraid to lose your warranty.
Gaming
For gaming, I have the obligatory Xbox360 (featured on the left on the first picture), and a Wii I won at a raffle (about the only time I ever won something) (featured on the right on the first picture).
I don’t use my Xbox360 as a media extender or anything because it’s noisy and, unlike my Media Center PC, needs to be turned on and off (the failure rate on this console is bad enough that you probably don’t want to keep it running all the time!). I however recently bought a couple of videos off the marketplace on it so it may take a more prominent role in the future.
Bringing it all together
Because I obviously want to control all this from my couch without thinking about it too much, I have a Logitech Harmony 510 universal remote.
This is not the kind of universal remote where you need to press some switch button every time you need to control a different device. It handles things per “activity”, which means all the buttons can be mapped to various devices so that, well, you don’t need to think about it – “Menu” displays the menu, “Volume Up” increases the volume, etc., whatever device that means controlling.
Voilà!
And that’s it! The next steps are obviously to add some nice sound system, and finish ripping all those DVDs (which includes fighting the region lock crap because I bought some of my DVDs back when I lived in Europe).
Lately I’ve been playing around a bit with IronPython and how to embed it inside an application to add scripting features. I’m still figuring things out, but I had a hard time exposing global variables to the Python environment.
The idea was to expose a couple of .NET objects (mainly a few important managers/singletons from the app’s API) as global variables so that scripts could access and act on the important parts of the app (query the database, batch run actions, etc.).
At first, I exposed some objects as variables of my ScriptScope:
publicvoid SetupScope(ScriptScope scope)
{
scope.SetVariable("test_string", "This is a test string");
scope.SetVariable("test_callback_method", new Action(TestCallbackMethod));
scope.SetVariable("test_callback_function", new Func<string, string>(TestCallbackFunction));
}
The problem was that only interactive scripting would get access to those variables (I had a simple UI for typing commands to be executed on that ScriptScope). Using “test_string” in a function loaded from a module would result in a “name ‘test_string’ is not defined” error. Using either “import” or “global” would not fix it.
I then discovered the ScriptRuntime.Globals property, and tried to add something there instead.
publicvoid SetupGlobals(ScriptEngine engine)
{
engine.Runtime.Globals.SetVariable("test_global", "This is a test global variable.");
}
This didn’t quite work either, and was actually a step backwards: now I couldn’t even access this “test_global” variable from the interactive command line!
That’s until I tried the following:
import test_global
Now I could access my global variable! And using that import statement from my modules also successfully imported it into their scope. Yay!
I’m not quite sure why the import statement is working, and why the other things didn’t, but I’m a Python newbie so it’s not surprising. Reading the Python documentation, though, tells me “import” is used to import packages, not variables, so it remains a mystery to me… but at least, it works on my machine for now!