Recently, app.net has gotten a lot of attention, but I just don’t see the appeal. It’s basically a Twitter clone that you have to pay, and all of this for what? So that the API is nicer to developers and you don’t see a couple of “promoted tweets” once in a while?
It sounds like a very shallow goal for a supposedly “disruptive” communication platform. Sure it has some kind of grand plan to get us to the next level of connectedness through, err, innovative apps and mashups or something. But it doesn’t make things better on the ownership level. It’s still yet another data silo. And I’m fed up with silos.
Remember when we used to communicate through free, open, distributed and standardized protocols? You know, like emails or phone calls? Or even snail mail? My problem with Facebook or Twitter is not that I’m the product, but that I don’t own my data, and that there’s no competition or choice between service providers. They’re not only data silos, but business model silos.
Other people also got fed up with the slow decline of the open and connected web, and started writing the building blocks for distributed social networks. Several projects emerged from this, with the most famous being Friendica and Diaspora.
Friendica: its main advantage is that it’s easy to install – like most PHP projects, you just copy files on your server, edit a configuration file, and follow the instructions on the web. You just have a couple of additional steps after that to setup your crontab so it can synchronize posts in the background. It also has very good interoperability with pretty much all the other social networks. The big problem, however, is that it’s batshit ugly. Also, as far as I can tell, it only allows bi-directional relationships, like Facebook, which means that if you want to “follow” somebody, you’ll have to send a “connection request”.
Diaspora: announced with much fanfare a while ago, it felt like vaporware for the longest time until it actually looked like they were shipping something. The selling point is a Google+-like “friendship” model, where relationships are asymmetrical and can be classified with “aspects” (Diaspora’s version of Google+’s circles). However, as we’ll see in the next post in this series, it’s insanely complex to install, full of bugs, and has poor performance. It also only allows to cross-post to select competitors (Facebook, Twitter and Tumblr).
With that in mind, Diaspora doesn’t seem to me like the best alternative to commercial social networks – it’s the only one so far. In this journey to Diaspora, we’ll look at:
Almost 4 years ago, I wrote a short article on dumb websites who have a maxiumum password length.
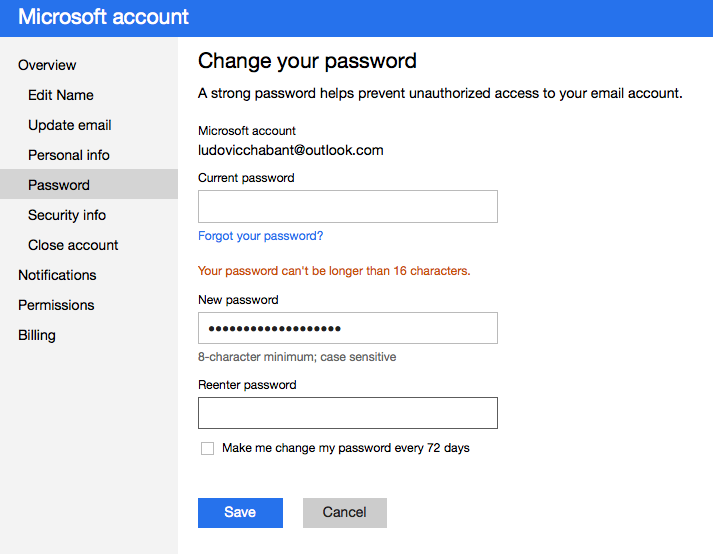
Now, in 2012, there are still websites with such stupid policies. One of the most famous is none other than Microsoft’s Live Account service, which serves as the authentication hub for all things Microsoft. Basically, your Live ID, or whatever it’s called, can’t have a password longer than 16 characters.
Microsoft is, rightly so, getting a lot of criticism about that because the recently released Windows 8 lets you link your Windows user to a Live ID, for use with the whole Windows App Store thing and more. This means, in most cases, that your Windows password can’t be longer than 16 characters, and, in other cases, that you have all kinds of weird account related bugs and you may need to enter a truncated password.
Back in the first part of this 2-part post we looked in some detail at how MacOS mounts network shares, and how badly designed this feature is compared to its Windows counterpart.
We’ll now look at the solution I’m using to fix the problem, which is to mount network shares in a consistent way for a multi-user machine.
The work around
Thanks to the power of UNIX, you can get around the problem by spending hours reading boring documentation, searching useless forums, editing obscure configuration files and generally speaking wasting your time for something Windows gets right in 2 clicks.
If you do the research, you will find lots and lots of solutions – some clever and some completely stupid. Not all of them worked for me, so here’s the solution I came up with. It uses the autofs feature supported by most recent versions of MacOS, and has some pros and cons. “Your mileage may vary”, as they say.
Creating custom mount points
Start by editing /etc/auto_master. It should look like the following, but without that last line. Add it using your favorite text editor (which you may have to run as root):
This file tells the automounter to treat the folders specified at the beginning of each line as mount points for the network shares specified at the end of each line. The file protocol I’m using is smbfs, which is the Windows file-protocol. You could try to use afp here, which is the Apple File Protocol, but I ran into permission problems on files I was editing or creating on my server. Also, depending on your server, smbfs may be faster.
I’m mounting my network shares in each user’s home directory, in a ~/Volumes folder, but you can mount them anywhere else – the whole point here is to have one “mount sandbox” per user instead of the system-wide /Volumes.
Also, here I’m specifying network shares with a custom username and password. You may not need that if you’re using the same credentials on both the local machine and the server. Of course, replace server with your actual server name or IP.
Once that’s done, run sudo automount -vc to tell the automounter to refresh. If it doesn’t work, you may have to create the ~/Volumes directory, along with the mount points themselves. I also ran into problems where the automounter would still be a bit confused and had to reboot to make things work, so you can try that as a last resort.
Accessing the network shares
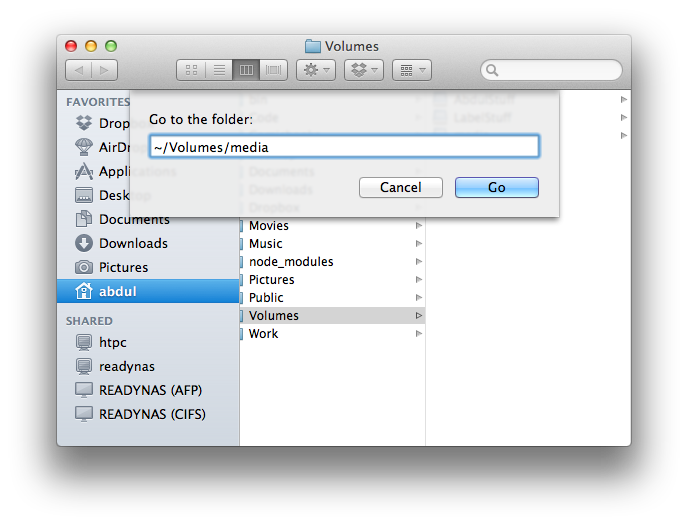
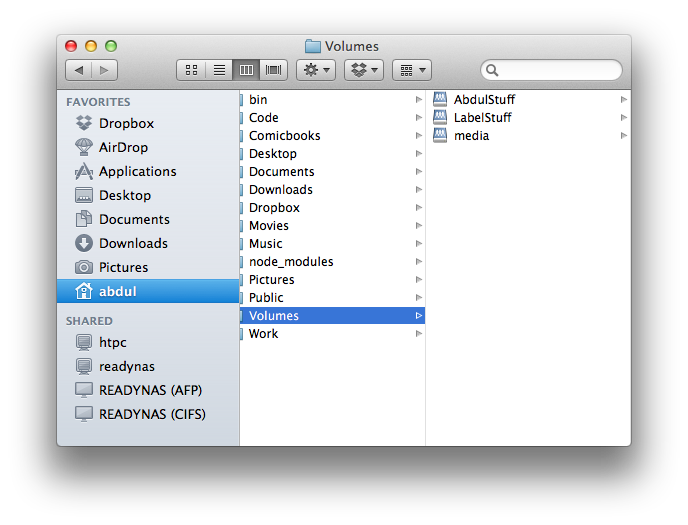
That’s the totally lame part: the mount points you created are not displayed in Finder until they are actually mounted. They will show up only after they’re mounted, which only happens when needed, i.e the first time they are accessed. So, at first, your ~/Volumes directory will be empty – at least in the Finder (if you go there using a Terminal, you will see the mount points, and you can cd into them, which would trigger the mount and make them appear in Finder! Yeah, it’s confusing, I know, welcome to the Apple ecosystem).
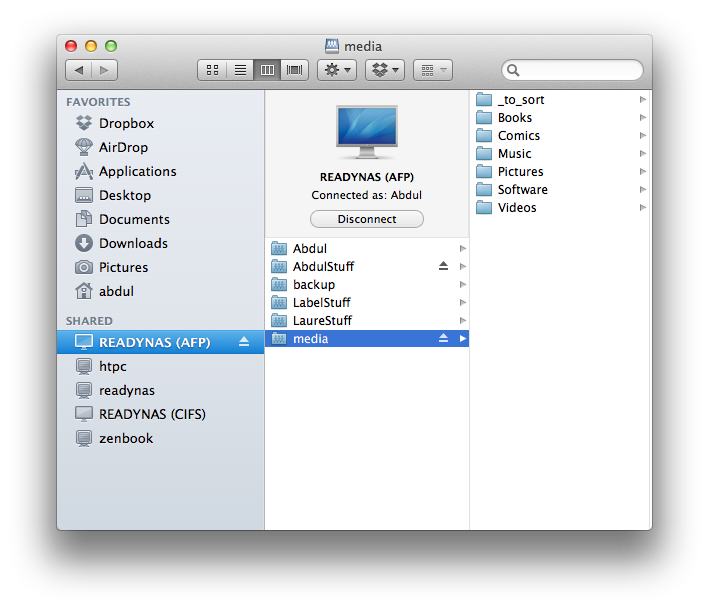
How do you access your network shares if you can’t see them in the Finder, then? Well you go directly to them with “Go > Go to Folder…” and enter, say, ~/Volumes/media:
You would only have to do this once in a while because once they are mounted, you’re unlikely to unmount them (you would actually need to use the command line for that). Also, once you gave that path to an application like iTunes or Lightroom, those applications can trigger the mount themselves by merely accessing the path: the next time you reboot and launch the application, it will all magically work (although you may notice a pause for a second or two as the system mounts the network share).
Alternatives
If you want the network shares to be visible in Finder as soon as you login, you can either:
Make a login item (a Bash or Apple script, for example) that will trigger the mount by accessing the path somehow.
Specify mount points in /etc/fstab instead of through the automounter.
I myself prefer staying with the automounter, because it means I won’t get a timeout when I log into my laptop but I’m not at home. Since I rarely reboot, it’s very uncommon for me to have to manually re-mount my network shares.
Conclusion
This is what makes it possible for me to use my home server along with sharing my Macbook with other users. It was a lot more complicated than I anticipated, but I guess making Macbooks play nice with custom servers would go against Apple’s new cash cow, a.k.a “iCloud”.
If you asked me a year ago what was the most awesome feature that Windows has and that MacOS doesn’t, I would have probably scratched my head for a bit, mentally sorting through all the obscure advanced things you can do with the Windows SDK and a few lines of code, or all the little things that make organizing files so much easier than with the horrible Mac Finder.
But if you ask me now, I’ll reply straight away this: mapped network drives.
You would think there’s not much to it, but this has been my biggest problem as a user when I switched to a Macbook Pro as my main machine. In the first part of this 2-part post, we’ll look at the problem. Go to part 2 for the solution I’m using.
WTF is a mapped network drive?
In case you don’t know, here’s a little crash course in mapped drives. You can skip ahead if you’ve already used them.
Windows famously uses drive letters for each physical or logical drive hooked up to your computer. This means in most cases you would access your main system drive as C:, some secondary drive as D:, a USB thumbdrive as E:, etc. However, you can also be part of a network, and this means you would access a server’s shared directory as \MyServersharename.
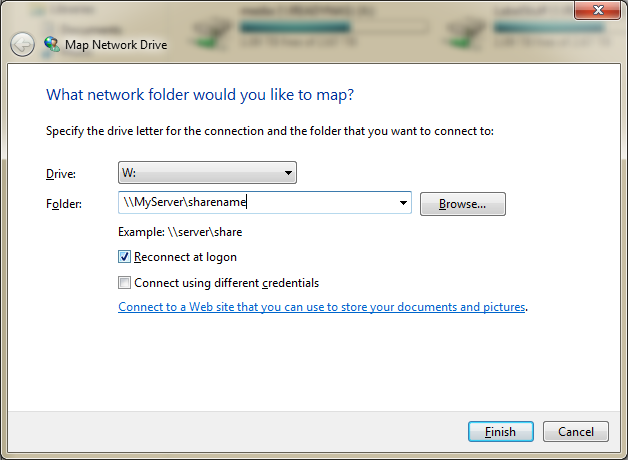
To make things simpler, you can map a server’s shared directory to a new drive letter like Z:. This is not an advanced feature. In fact, it’s always right there in the explorer’s toolbar when you open “My Computer”.
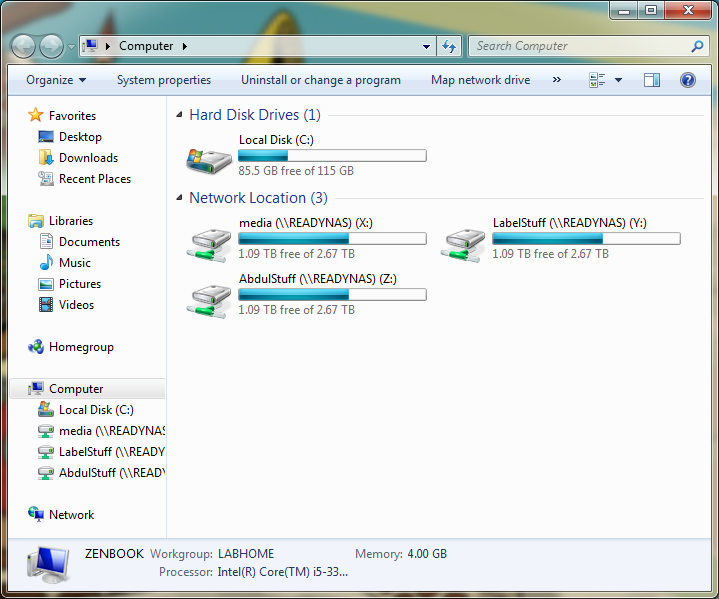
By the way, you can see here my typical setup at home, where I mount 3 shares from my file server: one for my personal data, one for the family data like pictures and home videos, and one for miscellaneous media like movies or music.
Setting up a mapped network drive takes about 2 clicks and a few keystrokes:
Click on “Map Network Drive”.
Type your server’s name and share name.
Optionally enter specific credentials if the share is protected.
Done!
At this point, you have a simple and convenient access to your server in a way that’s totally transparent to any application you may run. You can for example run a media manager like iTunes or MediaMonkey and tell it to look for music in Z:Music. It will always work – at least as long as you checked the “Reconnect at logon” option, and you’re of course connected to your network.
Doesn’t MacOS have something similar?
It does. Kinda.
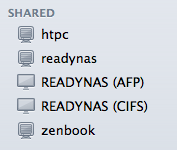
When you’re connected to your network, you will see the available servers in the “Shared” sidebar of the Mac Finder:
My server here shows up multiple times because it exposes several file protocols that MacOS understands (comparatively, out of the box, Windows only understands its own file protocol and not the Unix or Apple ones).
Once you click on a server, you can browse its shared directories that are available to you, and when you dive into one, it will “mount” it on our file-system. You can tell it’s mounted because the Mac Finder will show an “eject” button next to each mounted share, and next to the server itself. Here I mounted 2 shares:
Just like on Windows, the server share is mounted in a way that should be transparent to applications. So it should all work out fine, right?
Well, no.
Under the hood
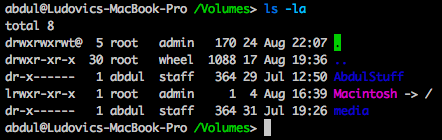
MacOS is based on a UNIX-like architecture, so there are no drive letters involved here – only mount points that look like directories on the local file-system.
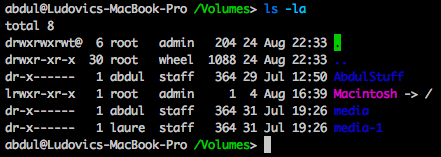
Sure enough, if you open a Terminal and go look into /Volumes, you’ll see the mount points for the stuff I mounted in the previous screenshot:
My media folder on my file server is mounted as /Volumes/media, and if I point an application like iTunes to it, that’s the actual path it will use behind the scenes.
The problem of multiples
What happens if another user (say, my wife) logs in and also wants to mount the media folder to listen to some music? Or what happens if you want to mount another share called media from another server?
Well, MacOS, just like any other UNIX-based system out there, does something very stupid: it appends a number at the end of the mount point:
My wife’s media folder is, under the hood, mounted as Volumes/media-1. Other attempts at mounting something with that name will result in Volumes/media-2, Volumes/media-3 and so on.
Of course, this all depends on who mounts things first. If I was the one who logged on to the Macbook later, I would have been assigned media-1 when my wife would have media.
Compare that to Windows’ mapped network drives, which are user-specific, which means there’s no problem as long as you assign the same drive letter to the same network shares – which is a trivial thing to do.
Bad things happen
This is where things break down rapidly.
Did you originally, and unwillingly, tell iTunes your music was in /Volumes/media? Well, now your whole library is empty because it can’t access that directory – it either belongs to one of the other users, or it has been unmounted. Worse, it could actually point to a completely different share that you mounted from another server because it has the same name.
The same thing happens with your Lightroom pictures, your documents or presentations with embedded assets, and any other program that stores paths to some type of data you may have on a file server. All of a sudden, life is not worth living anymore.
The cynical in me tells me Apple doesn’t care about you if you’re sharing your laptop with someone else anyway – they’re not interested in cheap people – but it could actually happen even if you’re the only user: if there was a problem with the server, or with the network connection, well, let’s just say MacOS will be very happy to give up trying to mount your network share at its original mount point, and will instead do it with a new mount point, again with the number suffix. So you could end up with /Volumes/media-1 even if you’re the only user logged in.