UE5 Gameplay Cameras: Activations and Black Boxes
This is another article in my developer diary for the Unreal Engine camera system.
The Gameplay Cameras (GPC) plugin currently still has the “experimental” status, but the plan is to upgrade it to “beta” for UE 5.8. This means I have to clean up a few mistakes I made with some of the early designs. The first big mistake was how and where the camera system activates from and runs… let’s dive in!
Camera Systems, Actors, and Black Boxes
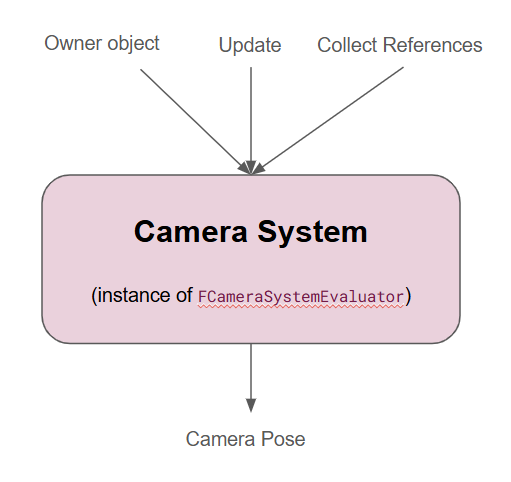
A camera system is really just a big black box that spits out a bunch of camera information (transform, field of view, post process settings, etc.) It can run from anywhere, and it’s especially easy to do so with the particular implementation found in the Gameplay Cameras plugin.
In GPC, the “camera system” is really just an instance of the FCameraSystemEvaluator class. It’s a dumb old C++ class, and can be instantiated anywhere: inside an actor, a player controller, a unit test, whatever. It just needs a few things, such as knowing what object it lives inside of, being told to update, and being told about garbage collection.
Relevant to the rest of this article, a camera system can run a bunch of different camera behaviours (“Camera Rigs” in the GPC parlance) and, hopefully, do some fancy blending between them (“Camera Transitions” in the GPC parlance).
Attempt #1: Camera System Actor
Trying to make it “transparently possible” to do this fancy blending is what drove the original design in UE 5.5. The plugin would automatically create an actor that runs a camera system instance, and set that actor as the View Target — it was appropriately called the Gameplay Camera System Actor. Then, the other GPC components would recognize that actor and talk to it, making it possible to, say, blend from one GPC component to another GPC component using Camera Transitions. It was basically supposed to “just work”. Blending to a non-GPC View Target would work as usual (blending out the whole camera system’s output), and blending back to a GPC component would automatically re-add that camera system actor as the View Target first (blending the whole camera system’s output back in).
This worked OK in simple situations, but quickly fell apart in more real-world cases:
- A lot of gameplay and rendering code doesn’t like it when some arbitrary actor is set as the View Target. They don’t know that actor, they wonder where the Pawn is, and many things stop working.
- The GPC actors/components weren’t meant to be used directly as View Targets, since they relied on that other actor to run the camera system. Things that tried to set them as View Targets would find that nothing happens.
Attempt #2: Black Boxes
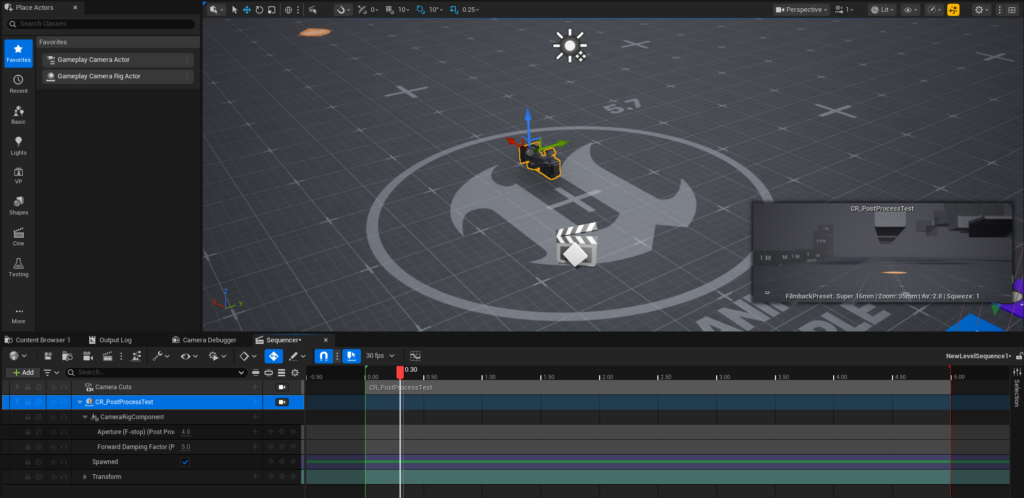
The second version recognized that an actor who wants to run GPC cameras must effectively be a “black box”. It must run its own instance of a camera system, and work as a standalone provider of camera goodness. In fact, it’s required to make GPC components work in Sequencer. That’s because a typical workflow when making a Level Sequence is:
- Make a spawnable camera actor (CineCamera or GPC Camera Rig actor or other)
- Add a Camera Cut track and set that actor as the active camera cut.
- Do some keying and animation
- Play!
The Camera Cut track is just a glorified call to SetViewTargetWithBlend() so there is no room for custom steps here: spawning a GPC actor and setting it as the View Target must just work.
So the GPC components became “black boxes” that not only run their own camera system instance, but also activate by default, running that system right away.
Setting an actor with one of these components as the View Target just keeps running the camera system under the hood, and blending to another GPC actor/component basically does a simple blend between two camera system instances’ outputs — they don’t know about each other. There is no fancy blending here, only the standard View Target blending. It works, but we can do better.
Attempt #3: One More Black Box
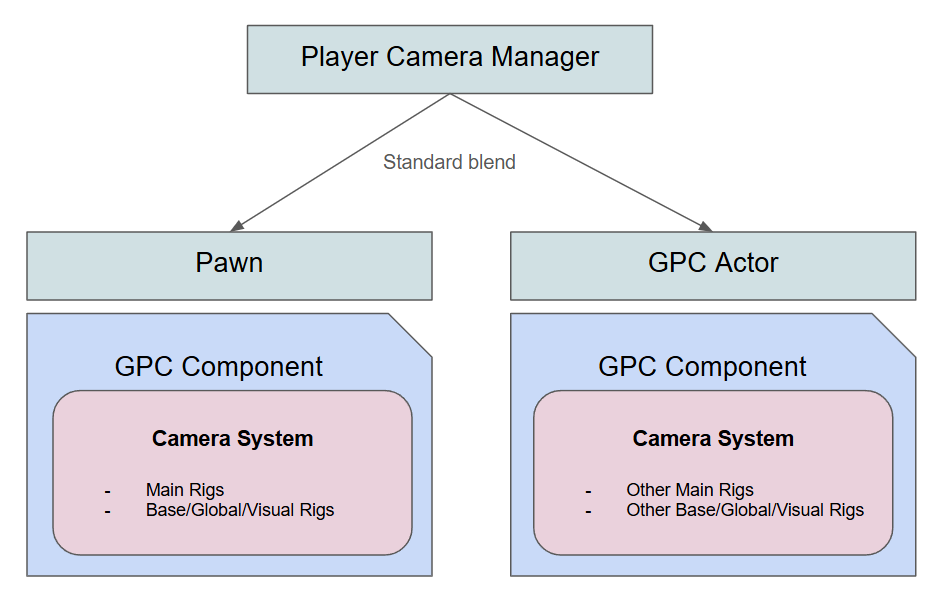
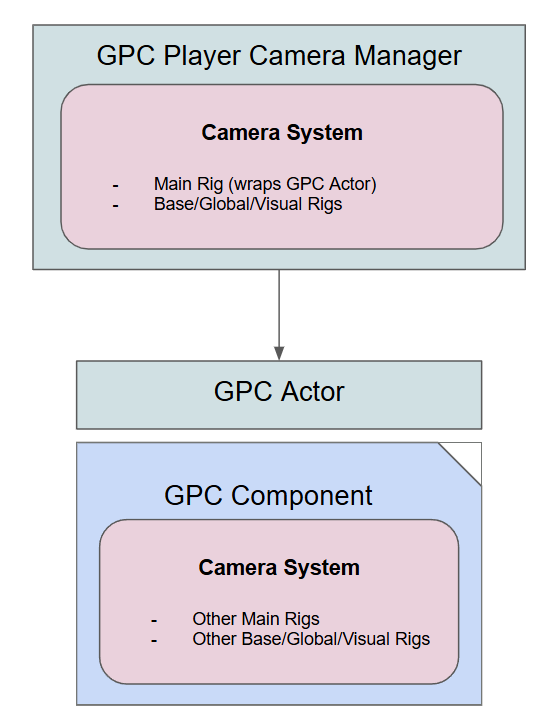
The current version is basically a refinement of the previous attempt. Sure, each GPC component is a black box, but we do want fancy blending at some point, right? And fancy blending between different actors/components requires some sort of central authority that can run a camera system instance.
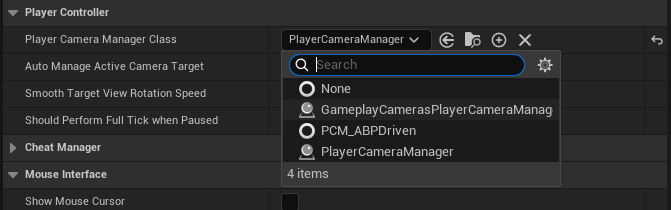
That central authority is the Player Camera Manager (APlayerCameraManager). By using a subclass that runs a GPC camera system inside it, you get the ability to use Camera Transitions (and more) between different actors/components.
You can write that subclass yourself — like I said, a GPC camera system literally takes only a few lines of code to host. What’s complicated is the rest. So there’s one GPC player camera manager available out of the box, the ridiculously named GameplayCameraPlayerCameraManager.
It comes at a small usability cost: you have to use GPC components as “camera modes” and not View Targets. Let me explain.
With this design, setting a GPC actor as a View Target effectively runs one camera system inside another. The GPC component is a black box, remember? So the camera system in the Player Camera Manager runs a camera system which run the View Target which runs another camera system. It’s lame but it works.
The GPC Player Camera Manager class has a few other APIs for running a GPC component as a “camera mode” of sorts. This is how Player Camera Managers often work in practice in many game projects: they run the game’s custom camera system which runs various “camera modes” (or whatever they’re called in that project), and you have some APIs (generally Blueprint APIs) that let you control that separately. Setting a View Target is then generally only for “custom overrides” such as specific fixed cameras (e.g. “spawn point” camera), or cinematic camera (e.g. Level Sequence cameras).
To activate a GPC actor/component as a “camera mode”, the APIs are ActivateGameplayCamera() and DeactivateGameplayCamera(). They take a GPC component and run it inside the Player Camera Manager’s camera system instance.
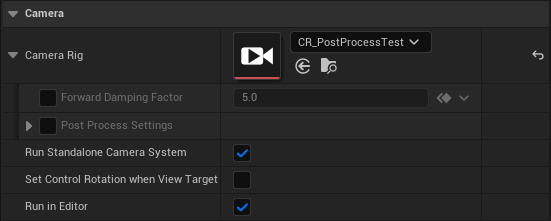
The GPC component must not be running in standalone mode, otherwise it would be running twice in two different contexts, and get confused. So you need to uncheck “Run Standalone Camera System”.
I debated whether to make other “pure camera mode” GPC components for this purpose, but it felt silly to make new components that are basically the same, only with a checkbox turned off… I may tweak all this a bit more in the future though.
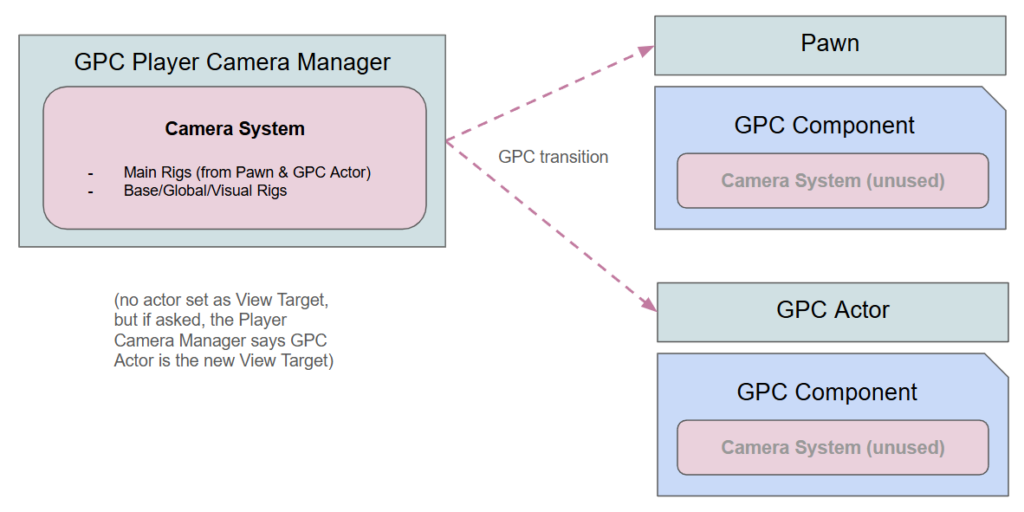
Note that while the GPC actors/components are activated with custom APIs (and not SetViewTarget()), the GPC Player Camera Manager still needs to answer the common question of “what’s the currently active camera thingie?”, also known as GetViewTarget(). It will always answer with the actor whose director is currently active.
In fact, this works in all cases because if you do eventually transition to another actor via SetViewTarget() (e.g. to blend to a CineCamera), then under the hood the GPC Player Camera Manager actually just wraps that inside a GPC camera whose director is a Single Camera Director that runs a Camera Rig that runs the actual actor (e.g. the CineCamera). It’s a bit of overhead, but it makes all the GPC features work even with an arbitrary actor is in control: GPC transitions, the Camera Debugger tool, etc. I think it’s worth it.
Q & A
Okay so maybe you didn’t want all the reasoning behind the changes, and just want to know how it works now. Here it is.
We Just Want to Use a Single GPC Camera
Use a GPC actor. If you only want one behaviour, use the Gameplay Camera Rig actor/component, which runs a single Camera Rig. If you want multiple behaviours orchestrated by a Camera Director, use the Gameplay Camera actor/component, which, well, runs a Camera Director that may switch between various Camera Rigs.
These actors/components start running as soon as they spawn (“Auto Activate” and “Run Standalone Camera System” are on by default). They just work.
We Want to Blend Between GPC Cameras
If you only need the basic/vanilla blend curves that UE has had for years, then use multiple GPC actors/components and use SetViewTargetWithBlend() as usual.
If you want to use fancy GPC features like Camera Transitions, pre-blending, and so on, then you either need to put everything inside the same GPC actor/component, or move to using the GPC Player Camera Manager, which can orchestrate the switch from one actor/component to another.
What Happened to my GPC Camera’s Base/Global/Visual Camera Rigs?
If you’re running a GPC actor/component in standalone mode, you can activate persistent (base, global, and visual) camera rigs in its hosted camera system. But of course, it’s all local to that one actor/component. When you blend to another View Target, none of these will be visible anymore (although they still run!), even if the other View Target is also a GPC actor/component… that’s because that other View Target is also probably running in standalone mode, with its own camera system and its own persistent camera rigs.
To get persistent camera rigs that actually “transcend” whatever View Target is currently active, those need to run in a centralized place that doesn’t go away with View Targets. That’s, for instance, the GPC Player Camera Manager. It has similar C++ and Blueprint functions to activate and deactivate persistent camera rigs.
The same logic applies to things such as GPC camera modifiers or GPC camera shakes. If you start playing a GPC shake on a GPC actor/component that runs standalone, then you will only see that shake while that actor/component is the View Target.
We Have an Extra One-Frame Latency with our Camera Behaviours
If you’re running your gameplay camera in a standalone-mode GPC actor/component, that camera’s logic is run in Post Physics by default. But it’s also run as part of the whole big batch of updates for all actors who run in Post Physics. So if you have a camera that depends on other actors or gameplay systems, and these things run in or after Post Physics, you may indeed see your Camera Rigs using last frame’s data when running their logic.
Again, that’s where the GPC Player Camera Manager comes in. The Player Camera Manager class exists to run camera logic at the very end of the engine tick. If your Camera Rigs run from there, you’ll skip a whole category of one-frame-delay bugs.
Should We Always Use the GPC Player Camera Manager Then?
Well, probably? It depends on whether you’re using GPC cameras for a few things here and there, or if you’re relying on it for the whole game. If the latter, then yes, definitely: disable standalone mode on most (if not all) of your GPC components, and use the custom APIs on the GPC Player Camera Manager to activate and deactivate them, instead of setting them as View Targets.

Was this helpful or confusing? Do you still have questions? Well, y’all know where to find me!
In fact I’ve been pretty surprised by the amount of emails, Discord messages, and so on I get from UE developers… keep it coming! I may take days or even longer to reply, but I will reply eventually, and definitely appreciate the questions and comments!