Consolidate instant messaging accounts into your Gmail
Everybody knows that Gmail is great for consolidating multiple email accounts into one place that’s easy to search, organize, backup, and get out of. What less people know is that it’s also a great place to consolidate your instant messenger accounts, too!
Watch out, this article is pretty long and gets quite nerdy at the end.
Some background information (and a few rants)
We’re going to talk about merging accounts from different instant messaging services (Gtalk, MSN, ICQ, etc.) so let’s get this out of the door first: yes, I could use programs like Pidgin or Trillian to log into all those networks simultaneously, but I’d still have to search in at least two places when it comes to past communications, and that’s without considering problems like chat history being only stored locally on one computer, which means I then have to sync that with my other computers using Dropbox or Mesh. Also, it’s really way to simple for my tastes. There’s a better, more complicated and geek-fulfilling way.
Google made the very good decision of using Jabber, a.k.a. XMPP, an open protocol, to implement their own instant messaging system Gtalk. As usual with Google, though, they didn’t quite follow the standard entirely but it’s compatible enough for what I need… mostly. The other good thing with Google is that they integrated the whole thing into Gmail so that chats are searchable along with emails, which is what I’m after, here. Some people may be uncomfortable with the privacy implications, but those people probably don’t use Google services anyway (why would you trust them with your emails or videos or pictures but not chats?). In fact, people worried about privacy probably don’t use many web services in general, unless they’re one of those weirdoes who actually read the whole terms of services and really compare them (I don’t even know if such weirdoes exist). Besides, when you start worrying about privacy, you generally end up setting up your own email server, which then makes you worry about other things like backup, whitelisting/greylisting, encryption, etc… Anyway.
So what then? Well, the XMPP protocol has things called “transports” who basically translate to and from other IM networks like MSN, Yahoo and others. That’s the way we’ll consolidate all our IM networks into Gmail!
There are a few tutorials out there that explain how to set that up, so I’ll quickly walk through the first steps and then get to what I did differently, which is the good part.
Setting up Psi IM
Go and get Psi, a cross-platform instant-messenger client that has one of the most complete feature sets out there when it comes to Jabber magic.
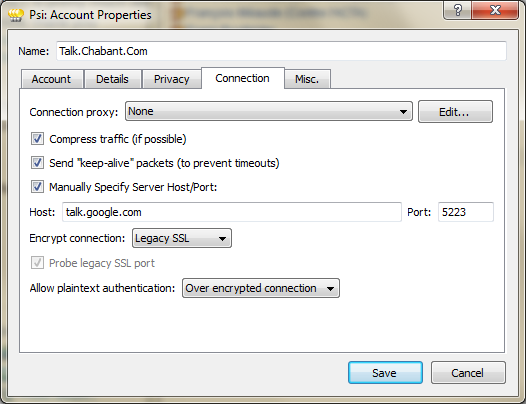
Create an account in Psi that will connect to Gtalk. You can follow one of the previously linked tutorials for that, or Google’s own instructions. Apart from the login/password, it mostly comes down to the following settings:
If you’re using Google Apps, you’ll also have to add a few records to your DNS zone file. The instructions are provided by Google (you obviously need to replace “example.org” with your own domain):
_xmpp-server._tcp.example.org. 28800 IN SRV 5 0 5269 xmpp-server.l.google.com.
_xmpp-server._tcp.example.org. 28800 IN SRV 20 0 5269 xmpp-server1.l.google.com.
_xmpp-server._tcp.example.org. 28800 IN SRV 20 0 5269 xmpp-server2.l.google.com.
_xmpp-server._tcp.example.org. 28800 IN SRV 20 0 5269 xmpp-server3.l.google.com.
_xmpp-server._tcp.example.org. 28800 IN SRV 20 0 5269 xmpp-server4.l.google.com.
_jabber._tcp.example.org. 28800 IN SRV 5 0 5269 xmpp-server.l.google.com.
_jabber._tcp.example.org. 28800 IN SRV 20 0 5269 xmpp-server1.l.google.com.
_jabber._tcp.example.org. 28800 IN SRV 20 0 5269 xmpp-server2.l.google.com.
_jabber._tcp.example.org. 28800 IN SRV 20 0 5269 xmpp-server3.l.google.com.
_jabber._tcp.example.org. 28800 IN SRV 20 0 5269 xmpp-server4.l.google.com.
At this point, you should be able to chat through Psi without anything new compared to Gtalk besides the warm fuzzy feeling of using a non-Google open-source client to do so.
This is where the previously mentioned tutorials make you connect to 3rd party servers running those “transports” in order to get access to the other IM networks. And this is also where I find the limits of my trusting nature. First, I don’t like giving my credentials for one service to another service. Second, I kinda know who’s behind the services I use on a daily basis (mostly either one of the big three, Microsoft, Google, Yahoo). On the other hand, I have no idea who’s running those Jabber servers (judging from their main websites I’d say it’s a mix of geeky individuals, bored IT technicians, universities, and shady businesses). I don’t really want to give any of those guys my Windows Live or Yahoo passwords… which is why I decided to run my own private Jabber server! (see? I told you it would be geeky and overly complicated!)
Running your own Jabber server
The idea is to run your own Jabber transports so that there’s no 3rd party involved in your communications – only you, your friends, and the IM networks used in between.
Before we go into the tutorial, I’d recommend that you first set up the DNS records for the domains and sub-domains you’ll use for your server, because that will take a bit of time to propagate through the internet and you don’t want to test anything by using some temporary URL or the server’s IP (I’ll tell you why later). In my case, all I needed was an address for the server itself, and another one for the only transport I need so far, an MSN gateway. So I created type A records for “xmpp.mydomain.org” and “msn.xmpp.mydomain.org”.
At first I tried setting up jabberd2 but I found it to be a bit too cumbersome (why does it need 4 services, 4 configuration files, and 4 logs?) and difficult to troubleshoot. I ended up using ejabberd, which had more informative logs and documentation. Note that at this point, I don’t care about performance or scalability since this server will only be for me and maybe a couple of family members.
Setting up ejabberd was pretty easy since you only need to follow their guide, which tells you to add your server domain to the hosts list in ejabberd.cfg:
{hosts, ["xmpp.mydomain.org"]}.
If your server is behind a router, you’ll need to open ports 5222 and 5223 for client connections (standard and legacy SSL), 5269 for server connections, 5280 for HTTP requests, and 8010 for file transfers.
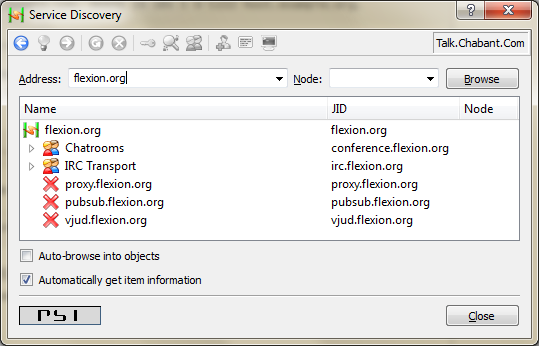
At this point, you should be able to go to the “Service Discovery” window in Psi, type your server’s address, and see a bunch of exposed services (although they will likely be disabled). The example below uses flexion.org which is not my server (I’ll keep it private, thank you very much), and shows a slightly different list of services than a default ejabberd installation… but the important thing is that you know your server is online, with the proper domain.
If it doesn’t work the first time, check ejabberd’s log file (making sure the configuration’s logging level is appropriate for errors and warnings). Your Jabber server may have trouble finding DNS information for your account’s servers (talk.google.com, mostly). In this case, the solution can be found on ejabberd’s FAQ. I used the 3rd listed solution, which is to add the IP addresses of nameservers like OpenDNS to the inetrc configuration file:
{nameserver, {208,67,222,222}}.
{nameserver, {208,67,220,220}}.
{registry, win32}.
Running your own MSN transport
Now at last we can download and install PyMSNt, which seems to be the most widely used MSN transport (oh, and it’s pretty much the only one, too). Once again, follow the installation guide, which will ask you to install Python and Twisted. PyMSNt will actually run in its own Python process, talking to the main Jabber server service via TCP.
PyMSNt’s configuration file, aptly named config.xml, only needs a couple of modifications for the transport to work: set the JID to your transport’s sub-domain (e.g. msn.xmpp.mydomain.org) and set the host to the same value. However, the tricky thing is that if your server is behind a router, the host value should instead be the IP of that machine on your local network (something like “192.168.x.x”).
Then, you need to edit ejabberd’s configuration file to add an entry in the “{listen” section:
{5347, ejabberd_service, [{host, "msn.xmpp.mydomain.org",
                                          [{password, "secret"}]}]},
Restart ejabberd, fire up PyMSNt, and you should see some entries popping up in ejabberd’s log about an external service getting connected, and a new route registered for server “msn.xmpp.mydomain.org”.
Go back to Psi, look at your server’s services again, and you should see an MSN transport available there (the example below uses the jabber.dk server, which actually exposes 4 MSN transports!):
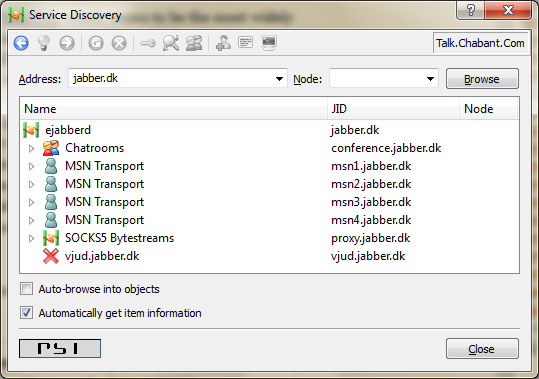
If all is good, you should be able to right click your MSN transport and choose “Register”. You’ll be asked to enter your Windows Live ID, which is all good because that will end up on your own server (and in plain text! Good thing it’s ours, eh?). Then, you’ll be asked to authorize the transport to register itself in your roster.
You should now see, in Psi, a new entry for your MSN transport in your contact list, under the “Agents/Transports” group. You should also pretty quickly start receiving authorization requests from all your MSN contacts. Since there can be a lot of them, you could, just before authorizing the transport, go into Psi’s options to enable “Auto-authorize contacts” (don’t forget to disable it later). Also, don’t worry, it’s only some handshaking stuff on the Jabber side of things – your friends won’t know what you’re up to, except that they’ll probably see you appear and disappear every 5 minutes for a couple hours while you’re testing 🙂
Getting all your contacts in line
Once your contacts are imported, you can casually chat with them and check that they don’t suspect anything. On your side, though, they all have ugly names… things like:
john_doe%hotmail.com@msn.xmpp.mydomain.org
It’s pretty easy to figure out… the first part is their IM handle (here, a Windows Live ID), with “@” replaced by “%”, if any. The second part is “@server.com” to turn this into a proper Jabber ID.
What I recommend doing, at this point, is to rename all your contacts in Psi to give them the same names they have in your Gmail address book. Then, close Psi, go to your Gmail contacts, and use the “find duplicates” feature. It will merge the new contacts (who have only that one weird Jabber ID as their email address) with your existing entries. It should also make those contacts appear as expected in your chat widget, or in Gtalk.
Note that all your contacts’ Jabber IDs are tied to your own Jabber server. This means that if you want to replace a transport by using another one from a different server, you’d get a whole new batch of contacts with IDs ending in the new server’s name. It’s a bit annoying, as it forces you to do some address book management to clean up the old unused IDs, and that’s why I said earlier that it wasn’t a good idea to start testing your server using a temporary URL or an IP address.
Some assembly required
If you’re in the same situation as me, not all of your contacts will show up in Gtalk. Actually, at first, only 2 of my MSN contacts showed up. I had no idea why, but I suspect some funky stuff going on with the very peculiar way Gmail decides who to show in your chat list based on how often you communicate with them (you can somewhat turn that off in the web widget by telling it to show all contacts).
In the end, I removed and re-registered with my MSN transport a few times through Psi, and each time I’d see more online contacts in Gtalk. Go figure…
There are a few other glitches. For example, every time I login with Psi, I get a message through the transport about how I should update to the latest Live Messenger to get new features. I don’t get that in Gtalk, but it’s probably because it doesn’t support messages from transports. Other glitches included problems connecting to the MSN servers or missing avatar pictures, but this is all fixed if you take the latest code from PyMSNt’s repository.
One big drawback, however, is that there doesn’t seem to be a way so far to backup the chat history you have on the cloud. Hopefully, Google will someday extend their data freedom philosophy to Gtalk, but in the meantime, using Psi (or some other similar client) exclusively is the only way to have a copy of your logs. But then again, if that was a big concern, you probably didn’t use Gtalk in the first place.
So far I’ve been using this setup for a week, and it works well. I’ll post an update after a month or so.


