Ramblings of General Geekery

This is why people buy Macs

A few months ago I set out to get a new laptop for my wife. She only had one requirement, after having shared a Macbook Pro with me for the past couple years: that it ran Windows (queue OS flamewar).

I quickly decided I wanted to give her something slick and light, and look at the new line of ultrabooks. I then narrowed the choices down to the Samsung Series 9 and the ASUS Zenbook by reading reviews online… but that was just the easy part.

IMG_8094.jpg

Much has been said already about the shopping and out-of-the-box experience of PCs, compared to that of Macs, but I think we should keep beating that dead horse until it’s underground. So keep reading for much deceased equidae action.

Getting your hands on the stuff

The first step is to actually get your hands on the models you’re looking for. But if it’s easy with a Mac – just walk into any Apple store or Best Buy or whatever – it’s not that easy with a PC.

Different stores carry different models, have different deals with manufacturers, and have different supply chains. Even given one store franchise, the availability of models will vary from store to store, and that’s not counting which ones are actually available on display: for some reason, a lot of stores wouldn’t let you touch expensive laptops like the 2 ones I wanted to try. Paradoxically, the Apple mini-store located in the next aisle would always happily provide multiple copies of each of their devices for people to play with.

In my case, London Drugs (here in Vancouver, Canada) was one of the only stores to carry the 2 models I was looking for – the whole point being to compare them side by side. But it still took me several visits to several stores all around town to find one with both units actually on display.

During my search, I got some interesting tidbits of information from sales people:

  • High-end laptops are already well taken care of by Apple, so shelf space is reserved for feature, mainstream, or budget oriented models from PC brands. Windows power-users therefore get forgotten in the process.
  • Some stores have issues securing those new ultrabooks, so they end up not having them on display at all. Unlike Apple, which provides appropriate locks for the Macbook Air, other manufacturers leave it up to the stores, who often use generic, bulky locks. But those locks often don’t work with ultra-thin cases… and when they do, they’re almost as heavy as the laptop itself, which completely ruins the experience of trying it out.

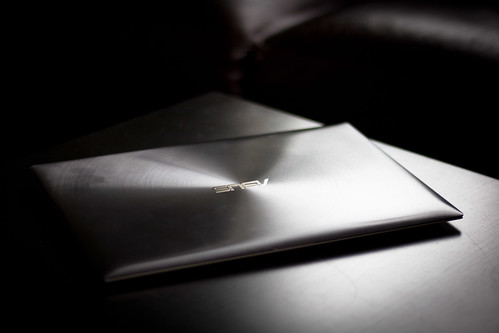
I eventually managed to test the models I was considering, and quickly decided the ASUS Zenbook would work better. Good news: the Zenbook Prime was just about to be released, with a much nicer body design and a supposedly better trackpad… so after a couple weeks waiting for that one to show up in store, I came back home one day with my precious gift.

IMG_8106.jpg

Stickers

The Zenbook is a beautiful machine, but like many PCs it comes with a bunch of ugly stickers. This is always totally baffling to me: what’s the point? Are people going to look at your laptop at Starbucks and go “I see your laptop has an Intel CPU inside! Mine too, this is so awesome! Much better than AMD, don’t you think?”.

No, all they do is waste 5 minutes of your time as you remove them and then clean up the sticky bits that they leave behind.

IMG_8103.jpg

The silver lining in this case was that all 3 stickers that come on the Zenbook are mostly in grey-ish tones similar to the laptop’s body – no flashy ugly colors here. So it’s not completely horrible. Just annoying.

Bloatware

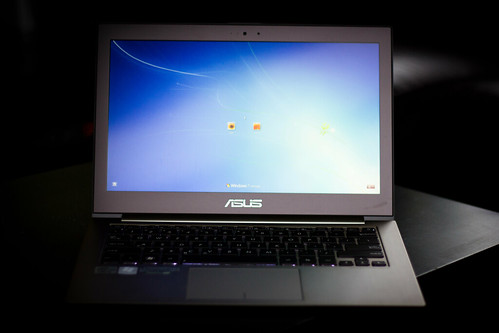
Another expected downside of buying a PC: all the bloatware that comes pre-loaded with it. Everything, from the moderately useful to the totally useless, can be found on the Zenbook once you boot it up. I counted around 20 “utilities” installed.

Of course, I opted for the usual practice of wiping everything and installing a fresh Windows on it. I had to fight the BIOS for a long time, trying to get the default GUID Partition Table to work with my bootable USB key. But the UEFI boot mode wouldn’t work for some reason, so eventually I gave up, re-allocating the whole hard drive as a more classic Master Boot Record partition. It’s kinda sad, this being 2012 and all, but as I understand it, I’m not losing much when it comes to a single 128Gb partition.

Of course, once Windows is installed, the fun has only begun: you still have to go to ASUS’ website to get the drivers for all kinds of components, along with downloading a whole bunch of updates from Microsoft.

Conclusion

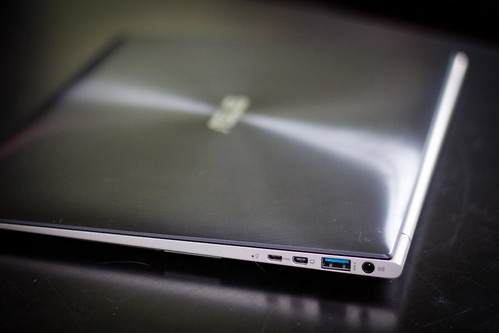
The Zenbook Prime, once you’ve been through all those hoops, is a wonderful little machine. It looks gorgeous, is very portable, and the performance is pretty good. The accessories are also nice, especially the leather-ish case for both the laptop and some of the cables. The power cable is the only poorly designed component in the whole package in my opinion, but overall, I recommend this laptop highly.

IMG_8098.jpg

But going through all these steps was pretty tedious. In comparison, the shopping and out-of-the-box experience of a Mac goes along these lines:

  • Go into any computer store.
  • Try any Macbook.
  • Give lots of money.
  • Boot it up.

I guess Microsoft Stores and Samsung Stores and the like are trying to address the issue, but it’s a long way away.


The state of Diaspora

In the main article about the road to Diaspora, we looked at setting up our own pod to interact with the Diaspora federated community. Now we’re going to look at how that actually works. Or not. Because since I set up my pod a few weeks ago, I’ve had nothing but problems.

The river of problems

To give you an idea of how bad Diaspora is, even after a couple years of development, look no further than the bug tracker on their Github project page. After a week of using my pod, I had already posted half a dozen issues – and that’s for just one user on a lonely pod. I wasn’t following a lot of people either. Some of those issues have been closed, some are still open. But the point is: this is not good for a project that’s been in beta testing for so long.

Then, there’s the performance issues. Ruby on Rails has never had a very good reputation in this department, but I thought it was mostly a “haters gonna hate” kind of reputation, or some remnant of the framework’s early days, when it was not necessarily very optimized. But after running Diaspora, I’m revisiting my opinon. On an Ubuntu VM with 512Mb RAM, the thin server that runs Diaspora is the only process that ever got killed for running out of memory – neither WordPress or MediaWiki or anything else ran into this situation. And that happens on a regular basis. We’re talking a couple times a day on average. And don’t even think of running a Rails console at the same time: it may work for a while, but you better get done quickly because one of the 2 processes will die soon enough.

And then there’s the whole “federation” aspect, which is the whole point of Diaspora. Spoiler warning: it doesn’t work. I don’t know if it’s related to the performance problems above (the process could be dropping important bits of information when it gets killed) but I always seem to be missing posts and updates from anybody else that’s not on my pod. Doing some testing between my pod and a few other well-known pods like joindiaspora.com or diasp.org, I get completely random results: sometimes a comment or “like” gets propagated in a few seconds, sometimes it takes hours, and sometimes it just doesn’t show up at all on one end or another.

I could go on and on about all kinds of little problems, from the completely stupid “PersonName started sharing with you!” email that doesn’t make any sense (because it means they’re following you, which means they won’t share anything with you unless you follow them back) to some weird design decisions around hashtags (try figuring out how to follow hashtags from other pods) to some obvious problems that never seem to get fixed (like useless Diaspora links to your Twitter cross-posts, or the inability to cross-post public posts to Facebook). I guess that’s what the Github bug tracker is for but, again, this really doesn’t look like a project that’s more that 2 years old.

Diaspora’s future

The original Diaspora founders recently left the project, saying they’re “giving it back to the community” while they “take the back seat”, a.k.a. Makr.io, a very stupid website concept. Some people say that’s the death of Diaspora, but judging from the state of it, it may actually be what saves it. The project was obviously badly managed and designed from the start, so maybe, just maybe, having a community of better programmers take over the codebase would make it viable.

There’s also the very, very slim possibility of someone either re-implementing Diaspora using a different framework than Ruby on Rails. Diaspora is mostly based on open standards – although the keyword here is “mostly” – so it would be possible to rewrite something from scratch that’s compatible.

There’s also the very, very slim possibility of someone writing something else that works better. Mike Macgirvin, the creator of Friendica, recently started working on “Project Red”, which is “Friendica taken to the next level”. His announcement didn’t hesitate to make fun of Diaspora:

Friendica WORKS today (unlike similar projects which are still struggling at basic communications after two years, and after squandering huge amounts of money).

Seeing how Friendica works and is easily installed – even though it’s ugly and useless to me – Project Red could be a good thing if it’s based on asymmetric relationships and Mike can enlist the help of a moderately talented web designer.

In the meantime, I don’t think we’ll get people away from Twitter and Facebook any time soon.


The journey to Diaspora: setting up your own pod

The first step in the journey to Diaspora is to get your own Diaspora server because, well, that’s the whole point of a distributed social network: you get to own your stuff (you could argue that, on the other hand, I’m not running my own email server, but, err, whatever, indulge me).

Unfortunately, setting up a Diaspora pod is insanely convoluted and complex.

After the jump, we’ll get into the meat of things and hopefully it will help you with the process (if you ever want to attempt it).

Follow the guide

Looking at the complexity of setting up a Diaspora pod, there’s something to be said about the Ruby community, who often seems to degenerate into a pile of over-engineered, over-complex set of weirdly named libraries and tools, all of which end up being very slow and memory hungry. Hipsters was the worse thing that ever happened to the Ruby language.

Anyway, enough trolling, you probably want to start by following the installation guides, over at Github. My server is an Ubuntu virtual machine so I followed the Ubuntu guide which will make you apt-get install a whole lot of packages, from system libraries to Ruby and the usual suspects (gem, bundler, rake, etc.). Once that’s done, you move on to the Diaspora installation guide itself, which is where things get fun (given a certain definition of “fun”), and where I’ll try to hold your hand (no homo).

Note that several “easy installer” initiatives are being worked on, mostly targeted at popular hosting companies like Heroku. By the time you read this, you may have something available for your situation.

Get an SSL certificate

The first thing you need is an SSL certificate for your domain. Since you’ll be exchanging potentially private communications between your pod and the other pods, it’s a good idea to go through https, which means getting an SSL certificate. You could usually use a self-signed certificate for this, but the bigger pods (a.k.a “community pods”) won’t accept that, so you need a proper certificate.

The documentation will point you at StartSSL, which delivers free class 1 certificates for your domain for a year. That’s enough to get you started. Just go to their website and follow the instructions – you’ll end up with a few keys and other serious-looking files. If you plan on hosting your pod on a sub-domain, don’t forget to add your top-level domain to the alternative domains falling under the certificate.

Getting Diaspora

If you keep following the installation guide, you will at that point have cloned the Diaspora repository on your server, run a few commands like bundle install, and edited a few configuration files. Here are a few tips, though:

  • Before you do all the RVM and bundler stuff, make sure you apt-get install libreadline-dev libncruses-dev. Hopefully this will make the readline gem work right away. We’ll talk about that later.
  • For some reason, the config/application.yml.example file features a pod_url with a port 3000 specified. Make sure you take this out when you replace it with your own domain URL. This has to be the real, public URL (otherwise your Diaspora ID will have :3000 in it!).
  • For me, the ca_file was /etc/ssl/certs/ca-certificates.crt, but it of course depends on your Linux distribution.

Of course, you’ll need to follow the instructions for setting up a “production” server. Don’t set serve_static_assets to true, there’s no need for that – Apache will serve the static assets already. Set single_process_mode to false, too, because it looks like it’s mostly for development/debugging purposes.

I’d recommend setting up the mailer right away (it’s the thing that sends notification emails). For some reason, even when mailer_on is false, Diaspora will try to send some emails, resulting in errors and failed jobs. It’s not a huge deal (maybe), but I like to avoid false positives in my error logs. Here it goes:

  • Install sendmail with some apt-get or something.
  • Set the mailer_method to sendmail.
  • That’s it! (although you can optionally set some nice email address for the sender).

Setting up the database

For some reason, the config files assume you’re going to run the app with the root MySQL user. I don’t know what they’re smoking over at DiasporaHQ but there’s no way I’m going to do that, so instead I created a new database myself, called diaspora_production, and a user with access to that database. You could call the database differently, I guess, but you would have to go and change the default name in all the configuration files. And I’m not sure if there’s any hard-coded stuff somewhere that references that database, so I went with the safe route of using their naming convention.

Once that’s done, you don’t need to run the db:create Rake task. Just run bundle exec rake db:migrate. You should see your database filling up with tables.

Apache configuration

Now you’ll need a web server to actually get anything working. I’m using Apache for this.

The first thing is to make sure the SSL/https stuff will be working:

  • If you don’t have that already, add NameVirtualHost *:443 and Listen 443 to your conf files to make Apache listen to incoming connections on port 443 (which is used for https). You can put that next to the similar directives listening to port 80 (which is standard http).
  • You’ll need to open port 443, obviously, in case you have a firewall (which you should have). Again, just look for where it deals with port 80, and copy/paste. If you’re using iptables, you should end up with something like -A INPUT -p tcp --dport 443 -j ACCEPT.
  • Make sure you have mod_ssl loaded/enabled.

Then, add an entry for the new website (your pod). You can use this Apache configuration that they point to in the installation guide. The only modification I did is to add a reference to the SSLCACertificateFile I got from StartSSL. So all my SSL stuff would look like this at the end:

SSLEngine On
# You generated those with StartSSL
SSLCertificateFile /path/to/cert.crt
SSLCertificateKeyFile /path/to/private_key.key
# You got those from StartSSL
SSLCertificateChainFile /path/to/sub.class1.server.ca.pem 
SSLCACertificateFile /path/to/ca.pem

For the rest, you don’t need to change much except the path to the Diaspora repository you cloned with Git. Make sure you specify the path to the public folder, not the root folder, otherwise it won’t find all the CSS and images and such.

Also note that you’ll need mod_proxy, mod_proxy_balancer and mod_proxy_http loaded/enabled for this to work.

Running the pod

Holy shit. See, what did I tell you, that it was insanely complicated? Well, it’s not quite over yet.

Now you can at last run ./script/server, wait a bit, and go visit your brand new pod. If everything’s good, you should have a little “lock” icon in your address bar (and if you click on it, it tells you your domain is verified by StartCom Ltd.). You should also see the Diaspora welcome page.

Go and signup! It’s all yours!

When that’s done, you can go back to config/application.yml and set registrations_closed to true so that nobody else can create an account (if that’s what you want).

Kill the server with CTRL+C and, while it’s down, open the Rails console with bundle exec rails c.

Remember when I talked about the readline stuff? Well, if you didn’t do it well, that’s where it fails. If so, you’ll have to patch the readline gem like I had to.

Go to ~/.rvm/src/ruby-1.9.3-p125/ext/readline and then ruby extconf.rb, make, and make install. Make sure you’re using the same version of Ruby to run extconf.rb than the version you’re patching! (if you only have one Ruby installed, you don’t have to worry about that last detail).

Running the console is for adding your newly created user to the “administrators” role, so you can get access to the administration dashboard: go to this FAQ page and look for “Roles”. You should see a bunch of stuff you need to type in the console to make yourself an administrator.

When you’re done, start the server again with ./scripts/server.

Administration tips

On your pod’s website, in the top-right menu (where you have “Contacts” and “Log Out”) you should see a new entry called “Admin”. Click on it. The most useful page here is the last one: “Resque Overview”.

Resque is the background job manager, which takes care of a lot of important stuff for your pod. The overview page will show you, among other things, any failed jobs. This is useful to troubleshoot problems and send bug reports.

Another hidden page is at /admin_panel. This is the Rails panel dashboard, where you can basically hack into your database to fix things, compare values, or clean data. It’s a bit dangerous but can be useful at times.

Conclusion

That’s it! If you made it this far, congratulations, you have absolutely no life. You should, at this point, be able to send useless status updates to your so-called friends, with the warm feeling that comes with using open standards.

In the next post in this series, we’ll look at all the problems you will face with your Diaspora pod – and there are many, unfortunately.