Ramblings of General Geekery

Visual Studio Tips & Tricks

Stephen Walther recently blogged about tricks that every developer should know about Visual Studio. Most of those he mentioned I use on a daily basis, so I highly recommend them. It actually surprises me how many other programmers don’t know about those features. Somehow, most programmers know Visual Studio as much as they know Microsoft Word: there’s a big space in the middle to type your text, and then maybe they know a couple of menus and shortcuts and that’s it.

Anyway, here are a few other features I use frequently:

Tip #1 – Use CTRL-I for incremental search

I’m a big fan of incremental search. It’s actually the reason I originally switch from Internet Explorer to Firefox, back when Firefox was in beta (I already had tabs with Netcaptor). By the way, I’m happy to see IE8 now also features incremental search but, well, I’m hooked on FF now… anyway…

In Visual Studio, the incremental search mode is entered with CTRL-I. Then you can start typing right away what you want to find. You can also use backspace and all, as expected. The only problem is that it uses the last search mode defined in the “Find” dialog, so if the “Match case” option is currently checked, it will only perform incremental search on what you type in a case sensitive way. This may be a bit confusing at first, but using incremental search really makes navigating code faster.

Tip #2 – Use navigate backward and forward

Like the first tip, this tip make it faster to navigate code (because we’re spending more time reading code than writing code).

CTRL– (minus sign) and CTRL-SHIFT– allow you to respectively navigate backward and forward. The first one is the one I use almost all the time: I’m looking at some code, see a call to a function, go to the definition of that function, search for something, and then I want to go back to where I was at first. Well, without having to worry about anything, I can navigate backward twice and I end up where I want. No need to find the correct tab, figure out if I stayed in the same file or not while jumping through the code, etc. Wicked!

Tip #3 – Define some external tools

You can define “external tools” with, surprisingly, the Tools > External Tools menu item. A common thing for me is to define revision control related stuff there because most of the time I don’t like how buggy and slow source control plugins are. I also do this in Visual Studio Express where there is no support for plugins at all in the first place.

For example, say you’re using Perforce. You can create a new external tool like this:
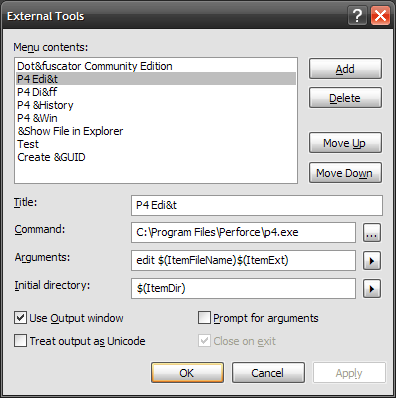
It will checkout the current file (the one you’re editing if the focus is in the text editor, or the one selected in the Solution Explorer if that’s where the focus is). Now you just need to bind “Tools.ExternalCommand2” (because it’s the second external tool) to the keyboard shortcut of you choice (mine is CTRL-K, CTRL-E for “open for edit”). Shazam! Just use your keyboard shortcut and you can checkout a file without leaving the text editor.

You can setup other commands, like show the history of the file or make a diff with the previous version. You can also easily adapt this to other systems, like SubVersion (except in this case you won’t need the “open for edit” command because SVN doesn’t lock files by default).


IronCow and the design for testability

IronCow is a library that wraps the Remember The Milk (RTM) web services. The “upper layer” of the IronCow API is an object model that stays in sync with the server and is designed with data binding in mind.

Of course, one of the things that went into IronCow’s design was testability. IronCow ships with a suite of unit tests that, well, test that the API is working fine. However, there’s another testability aspect: how the clients of your API are going to test their stuff. These are 2 different things:

  • Within IronCow, “design for testability” means I have to be able to mock the underlying client that communicates with the RTM REST API. Then, I can manipulate my objects and check that the correct requests are sent, and that those objects behave correctly according to the responses I give.
  • From the point of view of a client, though, “design for testability” means they have to be able to make IronCow behave a certain way, and test that the rest of their application behave accordingly.

The easy way to make an API testing friendly is to put everything behind interfaces. This way, the client can replace your stuff with test objects. But for some reason, I don’t feel like adding this kind of complexity to IronCow. It’s a pretty small API, with an object models that contains less than a dozen of classes, and hiding everything behind interfaces would triple the number of classes, add a couple of abstract factories, and more generally confuse clients that would otherwise expect a straightforward API.

Therefore, right now, to use IronCow in a test environment, you can disable the “syncing” behaviour like this:

Rtm rtm = new Rtm(); // You can also pass in your apiKey and
// sharedSecret here but it doesn't matter.
rtm.DisabledSyncing();
// From now on, there's no requests being sent.

When syncing is disabled, the IronCow object model just acts like a “dumb” object tree. Setting the name of a task or adding a new contact won’t trigger a request to RTM. Instead, it will just modify the objects locally, as if it was just a classic simple in-memory object model.

Note that you can’t reenable syncing.

The problem with this is that although the complexity of the public interface stays the same, the complexity of the internal code increases. I find it doesn’t increase nearly as much as when I tried to hide everything behind interfaces though. The other bigger problem is that it’s more complicated for clients to do behavioural testing. For example, if they want to test what happens in their application when a certain action makes IronCow throw an exception, there’s nothing to help them do that… In that case, they have to mock the IRestClient class, and use it with their Rtm instance. There are helper classes and methods to build RTM XML responses, but it’s not what you would call super user friendly (check the IronCow.UnitTests assembly source code for examples of how to use it).

So is this fine? No? Should I bite the bullet, add interfaces, and make this simple API be 3 times bigger and more complex? Is there a third option?


Fixing a bug can cause bugs

Microsoft apparently fixed something in .NET Framework 3.5 Service Pack 1 that previously didn’t work, or somehow worked differently. As a result, Milkify will crash if used on a machine that doesn’t have this service pack installed.

What you get is a XamlParseException that says that a ContentStringFormat property cannot be converted into a TemplateBindingExtension. This is because Milkify is using its own WPF skin where, among others, the check box control has a new custom template. This template is mainly a copy of the default one, courtesy of ShowMeTheTemplate, and looks like this:

<ControlTemplate x:Key="CheckBoxControlTemplate">
    <BulletDecorator>
        <BulletDecorator.Bullet>
            <Grid>
                <Border 
                  Width="18"
                  Height="18" 
                  CornerRadius="4"
                  BorderThickness="2"
                  BorderBrush="{TemplateBinding BorderBrush}"
                  Background="{StaticResource MilkifyWhite}"
                  HorizontalAlignment="Center" 
                  VerticalAlignment="Center" />
                <Rectangle
                  Width="6"
                  Height="6"
                  Fill="Black" 
                  Name="RectCheck"
                  HorizontalAlignment="Center" 
                  VerticalAlignment="Center" />
            </Grid>
        </BulletDecorator.Bullet>
        <ContentPresenter 
          RecognizesAccessKey="True" 
          Content="{TemplateBinding ContentControl.Content}" 
          ContentTemplate="{TemplateBinding ContentControl.ContentTemplate}" 
          ContentStringFormat="{TemplateBinding ContentControl.ContentStringFormat}" 
          Margin="{TemplateBinding Control.Padding}" 
          HorizontalAlignment="{TemplateBinding Control.HorizontalContentAlignment}" 
          VerticalAlignment="{TemplateBinding Control.VerticalContentAlignment}" 
          SnapsToDevicePixels="{TemplateBinding UIElement.SnapsToDevicePixels}" />
    </BulletDecorator>
    <ControlTemplate.Triggers>
        <Trigger Property="CheckBox.IsChecked" Value="False">
            <Setter TargetName="RectCheck" Property="Visibility" Value="Hidden" />
        </Trigger>
    </ControlTemplate.Triggers>
</ControlTemplate>

Note how the ContentPresenter control defines ContentStringFormat so that it uses whatever string format has been defined on the actual, instanced, check box. Of course, my main programming machine has SP1 installed so it worked fine.

Anyway, for some reason, this works in .NET 3.5 SP1, but not on plain default .NET 3.5. I can’t find much in the documentation about changes brought by SP1 that would explain why it behaves differently, and I don’t think it’s possible to tell ClickOnce that SP1 is a prerequisite to my application (you can only specify .NET 3.5 or not). I could remove that attribute completely, as I never specify it anyway, but it’s not the ideal solution…